
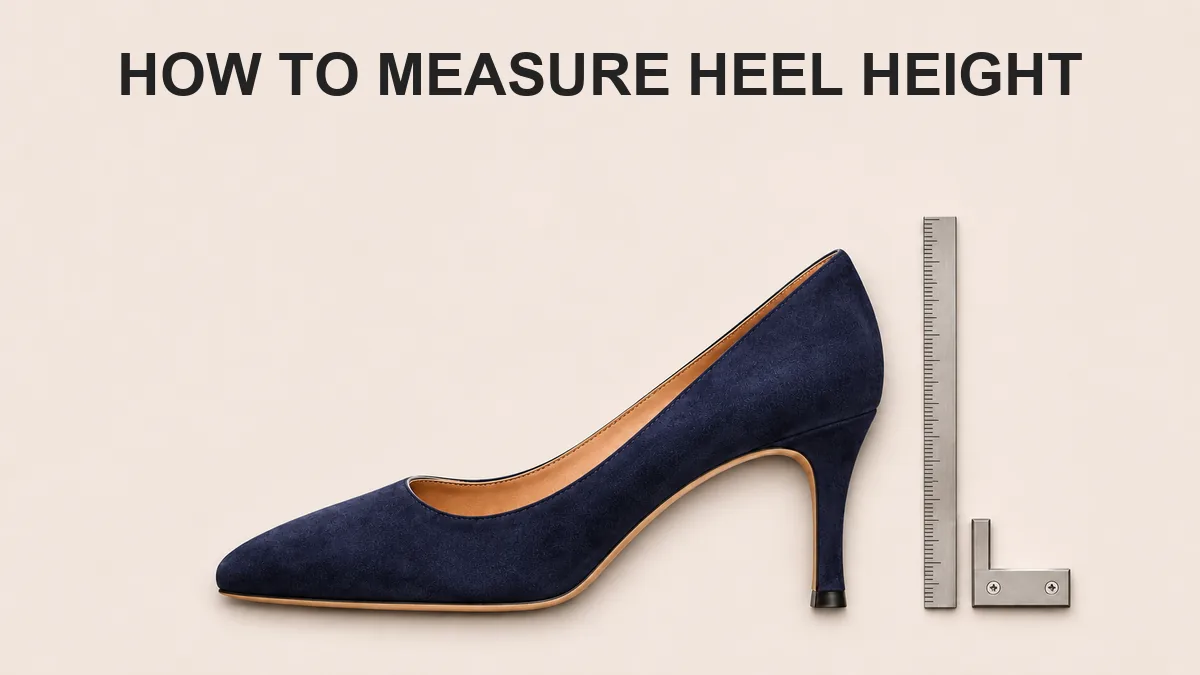
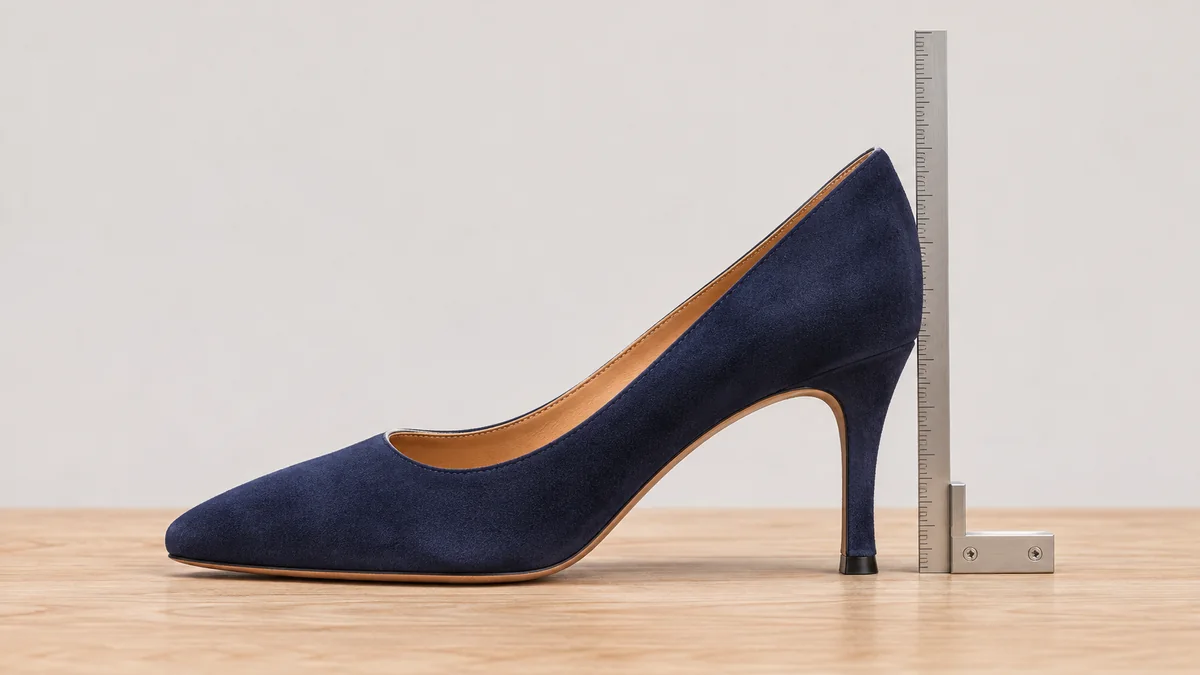
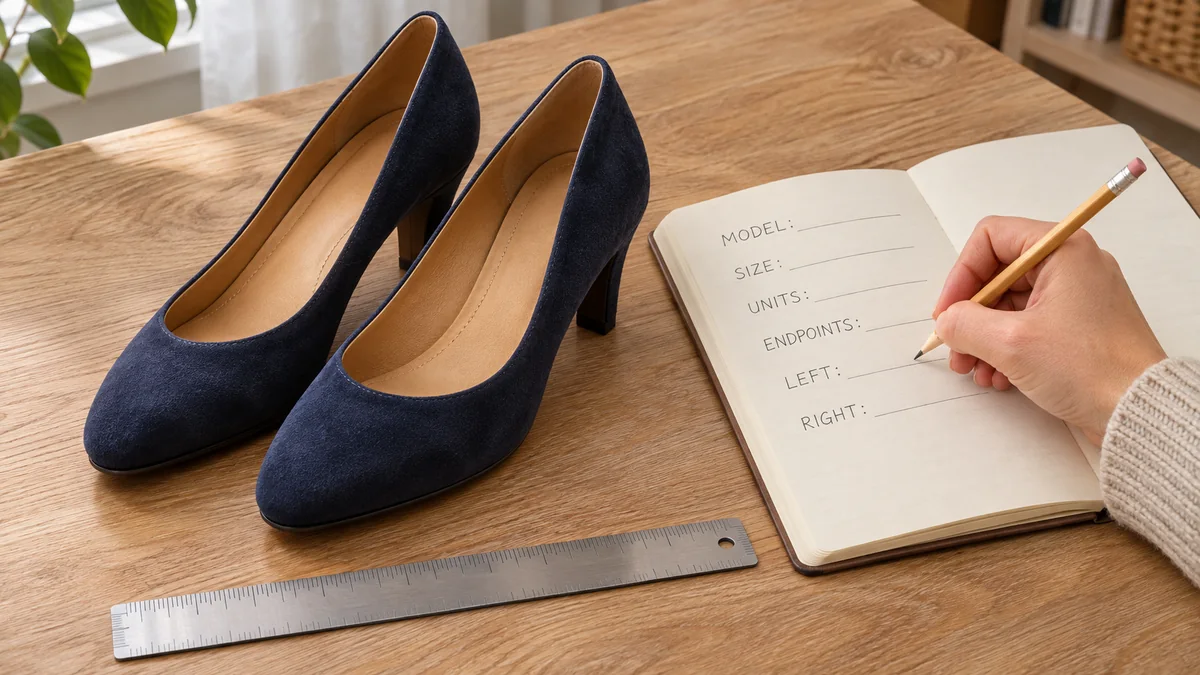
Here is how to measure heel height at home. Stand the shoe naturally on a firm, level surface. Hold a rigid ruler vertical, with zero exactly at the surface under the heel cap. Read straight up to the point where the heel unit meets the base of the footbed or sole. Do not measure to the top of the back counter, and do not run the ruler along the heel's curve.
That method follows the convention Bared publishes for its own shoes. Other brands and retailers define heel height differently, so a figure only makes sense once you know which endpoints produced it. Before you compare your number with a listing, or one listing with another, name the convention behind each figure.
Choose the Convention Before You Pick Up the Ruler
A heel height is a distance between two points. Change either point and the number changes, even on the same shoe. Decide which points you are using first, and write them down next to the figure.
The Bared Heel-Unit Convention
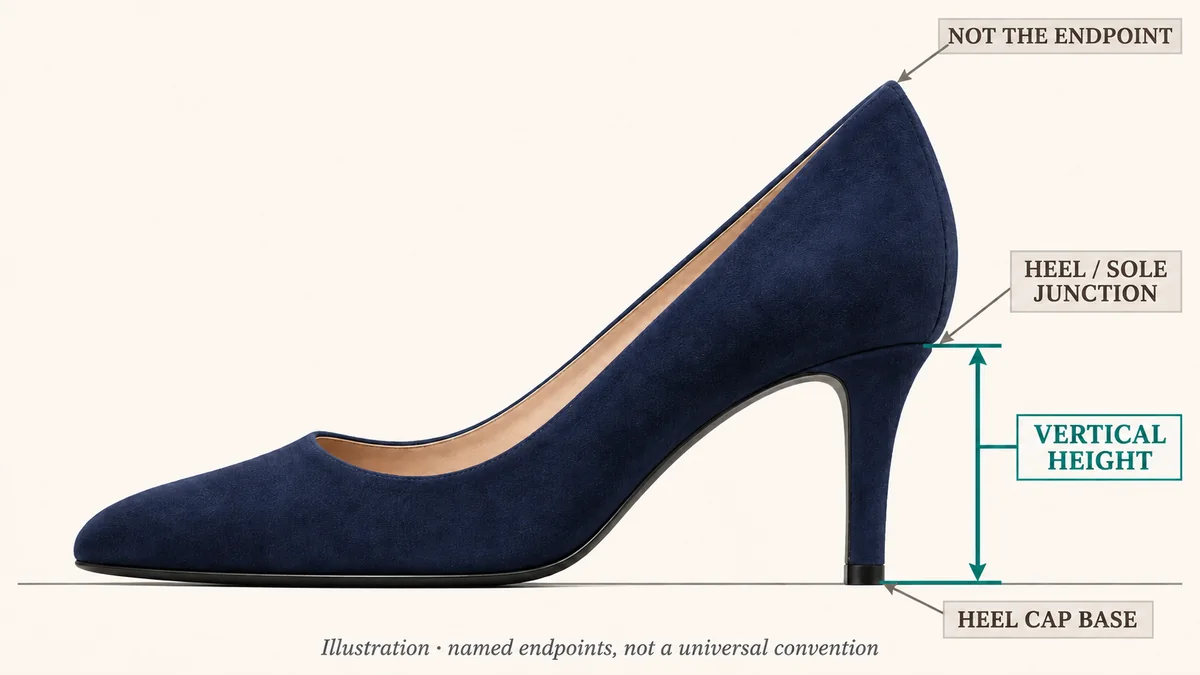
Bared, a footwear brand, states that its heel measurements run from the base of the heel cap to where the heel meets the base of the footbed or sole. Its diagram shows a vertical bracket between those two points.
The lower endpoint is the bottom of the heel cap, the tip at the base of the heel, where it touches the surface. The upper endpoint is the junction where the heel unit meets the underside of the footbed or sole. Bared lists its own heel heights in the Features section of each product page, so you can check that brand's figures against the same definition.
What This Convention Does Not Measure
It does not run to the top edge of the rear upper, the visible back of the shoe that wraps the heel. On a typical closed-back pump, that edge sits above the point where the heel unit joins the sole, so measuring to it gives a different, larger number. The heel counter, an internal stiffener in the rear of many shoes, isn't an endpoint either, because you can't see where it begins or ends. Heel height also has nothing to do with boot shaft height, which describes how far a boot rises up the leg.
Maker Definitions Govern Comparisons
Treat Bared's method as one named convention, not a rule every brand follows. Styletread, an online shoe retailer, describes its own process: it measures on a flat surface, from the bottom of the heel up to where the heel connects to the shoe, and it handles raised footbeds differently (covered below). When you compare figures, the exact definition each seller publishes is what counts.
What You Need
- A rigid ruler with a usable zero. One with zero at the physical end works best. If yours has a blank margin before the zero mark, don't count that margin as measured length or guess its size.
- A firm, level surface such as a table or hard floor.
- A set square or any rigid right angle (optional) to keep the ruler upright.
- A notepad or phone for recording.
- The shoe, off your foot and resting unloaded. It doesn't need to be new or never worn.
Step-by-Step: Measuring Heel Height
- Rest the shoe naturally. Set it on the surface the way it sits when nobody is wearing it. Don't press on the insole or the heel, because pushing down can shift how the shoe sits and make the reading hard to repeat.
- Find both endpoints. Locate the bottom of the heel cap where it touches the surface. Then trace the heel unit upward and find where it meets the base of the footbed or sole. A seam or change in material can help, but a stitch line or wrapped covering doesn't prove the heel ends there. If you can't tell where the junction is, record the heel height as unknown and ask the seller rather than taking the shoe apart.
- Set the ruler's zero at the surface. Stand the ruler vertically at the back of the heel with the printed zero level with the contact surface. If a blank end margin stops you doing that, switch to a ruler with zero at the end. Don't apply a guessed correction, and don't treat the physical end as zero when the scale starts higher up.
- Keep the ruler vertical. Many heels curve or slope. Follow true vertical, not the line of the heel. A set square standing against the ruler and the table helps. A measurement taken along the curve gives a length, not a height.
- Read at eye level. Lower your head until your eye is level with the junction. Reading from above or below shifts where the mark appears to line up.
- Read again. Lift the ruler away, set it up again from step 3, and take a second reading. If the two readings disagree, check both endpoints again before you record anything.
- Record the details. Write the model, size, unit (mm, cm or inches) and the endpoints you used, for example "heel cap base to heel/sole junction, Bared convention."
- Measure the other shoe. Repeat every step for the second shoe of the pair and record it separately.
If You Cannot See the Junction
Some designs hide the point where the heel unit meets the sole, for instance under a wrapped covering or within a continuous sole. If you can't locate it, record the heel figure as unknown and ask the seller. Don't cut, peel or take apart the shoe, and don't guess where a hidden endpoint sits. For background on how heels and soles are put together, see our guide to how shoes are made.
Measure the Platform Separately
A platform raises the front of the shoe, and it needs its own measurement with its own named endpoints. Styletread describes platform height as running from the bottom of the sole up to where the sole connects to the shoe. A home version looks like this:
- Keep the shoe resting naturally on the same surface.
- Pick a point on the front section of the sole where it rests on the surface, and note which point you chose.
- Measure vertically from the surface to the visible line where the sole meets the upper at that same section.
- Record the figure with a note of the point you used.
Use the visible junction, not the curled-up edge of the toe and not a guessed level inside the shoe. If you see no raised platform, write "no raised platform" or the maker's own description; that label doesn't mean the forefoot sole is zero millimeters thick. Record a forefoot figure only when you can locate both endpoints, and keep it apart from the style label. If a platform is visible but no comparable junction is, record the platform as unknown. An exterior figure describes the outside of the shoe. It can't tell you where the foot sits inside.
Heel Minus Platform: A Hypothetical Exterior Difference
Once you have both figures, you can subtract one from the other, but only when both run from the same contact surface to comparable exterior junctions. If one figure uses a different endpoint, or one is unknown, skip the calculation.
Here is a hypothetical example, not a measured shoe. Say a heel unit measures 100 mm and the platform measures 30 mm, both from the table surface to their visible junctions. The exterior difference is 100 − 30 = 70 mm, or about 2.76 inches (rounded).
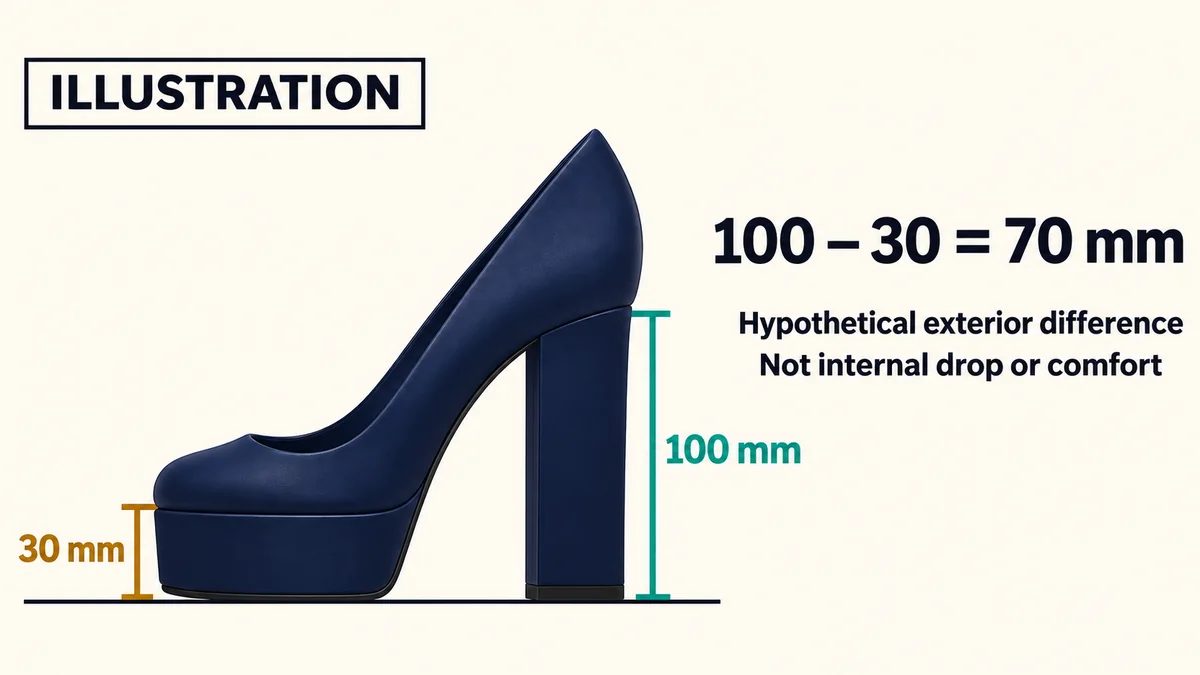
That 70 mm figure describes the outside of the shoe only. It doesn't tell you:
- the internal drop between where the heel and forefoot rest inside the shoe
- the pitch or angle of the footbed
- the stack height when the shoe is worn and loaded
- how comfortable the shoe is
- whether a maker's advertised heel height is right or wrong
Use it to compare shoes you measured the same way.
Heel Height Chart: mm, cm and Inches
The chart uses the exact definition 1 inch = 25.4 mm. The first table converts common inch figures exactly. The second converts round millimeter figures to inches, rounded to two decimal places.
Exact conversions
| Inches | Millimeters | Centimeters |
|---|---|---|
| 0.5 | 12.7 | 1.27 |
| 1 | 25.4 | 2.54 |
| 1.5 | 38.1 | 3.81 |
| 2 | 50.8 | 5.08 |
| 2.5 | 63.5 | 6.35 |
| 3 | 76.2 | 7.62 |
| 3.5 | 88.9 | 8.89 |
| 4 | 101.6 | 10.16 |
| 4.5 | 114.3 | 11.43 |
| 5 | 127 | 12.7 |
Rounded conversions
| Millimeters | Inches (rounded) |
|---|---|
| 30 | ≈ 1.18 |
| 50 | ≈ 1.97 |
| 70 | ≈ 2.76 |
| 80 | ≈ 3.15 |
| 90 | ≈ 3.54 |
| 100 | ≈ 3.94 |
| 120 | ≈ 4.72 |
To convert any other figure, multiply inches by 25.4 to get millimeters, or divide millimeters by 25.4 to get inches. The chart handles units only. It doesn't group heels into named height bands, so check any label a seller uses against the figure it states.
Why Two Listings Can Disagree
Two listings for similar shoes, or your own measurement and a listing for the same model, can show different heights without anyone making a mistake. The conventions three sellers publish show why.
Reference Size
Harriet Wilde, a bridal shoe brand, lists heel heights taken from a UK size 5. It says its smaller sizes run a few millimeters lower and its larger sizes a few millimeters higher, and it invites customers to contact its team for an exact height on a specific style and size.
Styletread says it generally measures women's shoes from an EU 37 or US 7, and men's from an EU 43 or US 9. It notes that measurements can differ for several reasons, including the size ordered.
These are each seller's own conventions. They don't give you a formula for adjusting a figure to another size, and they don't describe the same pair measured two ways. If your size differs from a seller's reference size, ask for a figure at your size.
Raised Footbeds
Styletread says that when a shoe has a raised footbed, it includes the footbed height in the heel height so customers are aware of the highest measurement. That figure runs to a different endpoint than a Bared-style heel-unit figure, which stops at the base of the footbed or sole, so the two numbers aren't interchangeable. If a listing doesn't name its endpoint, ask, and keep each number labeled with its convention.
A Measurement Record and Seller Questions
Keep one record for every pair you measure or consider, with a separate reading for each shoe. Write down the model name, the size and its system (UK, EU or US), the unit, and the two endpoints you used. Note whether the figure is your own unloaded measurement or the seller's quoted one. If you take a photo, shoot straight on so it shows the ruler's zero on the contact surface and the heel junction, and label the point you chose. A photo explains your setup; it doesn't prove the reading is accurate. Later comparisons only work if the endpoints stay the same, so mark any unclear or hidden field as unknown and ask the seller. The example row below is hypothetical, to show the level of detail worth writing down.
| Model | Size | Heel figure | Platform figure | Unit | Endpoints | Notes |
|---|---|---|---|---|---|---|
| Example pump (hypothetical) | UK 5 | 100 | 30 | mm | Heel cap base to heel/sole junction; forefoot surface to sole/upper junction | Junctions visible on both shoes |
When a listing doesn't match your record, or two listings don't match each other, send the seller these questions:
- Which endpoints did you measure the heel height between?
- What size was measured?
- Does the figure include a raised footbed?
- Is the platform included in the heel height, or listed separately?
Add the answers to the Notes column so each figure stays attached to its convention.
Your Next Step
Take your best-fitting current pair and measure it with the steps above. Record the heel and platform figures, the size, the unit and the endpoints. Then, before you compare that pair with any listing, ask each seller which convention its listed figure uses.
Frequently Asked Questions
Where do you measure heel height from and to?
Under Bared's published convention, measure vertically from the base of the heel cap, where it touches the surface, to the point where the heel meets the base of the footbed or sole. Keep the ruler upright rather than following the heel's curve, and don't measure to the top of the back counter. Other makers may use different endpoints, so check their definition before comparing.
Is the platform included in heel height?
It depends on the listing, so ask the seller what its figure covers. At home, record the heel and the platform as separate measurements, each with its endpoints. If both run from the same surface to comparable exterior junctions, you can subtract one from the other to get an exterior difference. That number isn't the internal drop, the footbed angle or a correction to the maker's stated height.
Is there one standard way brands measure heel height?
The sellers named in this guide describe their methods differently. Bared measures from the base of the heel cap to where the heel meets the base of the footbed or sole, while Styletread includes the footbed height when a shoe has a raised footbed. Harriet Wilde quotes heights from a UK 5, and Styletread generally uses a women's EU 37 or US 7; those labels alone don't tell you whether the measured shoes were the same physical size. Ask any seller for its exact endpoints and the size it measured.
Why is my measurement different from the listed height?
The listing may use different endpoints or a different reference size (Harriet Wilde uses a UK 5; Styletread generally uses a women's EU 37 or US 7), or it may include a raised footbed. Fill in your measurement record, send the seller the four questions above, and compare once you know its convention.
How many centimeters is a 3-inch heel?
Exactly 7.62 cm, or 76.2 mm, because one inch equals exactly 25.4 mm. The chart above lists other common heights in millimeters, centimeters and inches.
About TLSTAGE
Since 2012, TLSTAGE has been your trusted one-stop fashion supply partner from Guangzhou, China—specializing in women's footwear, apparel, bags, and accessories.
What started as a specialized footwear supplier has grown into a full-range fashion supply partner, driven by client trust and proven by consistent quality across every product category.
- 20+Years Industry Expertise
- 30+Countries Served
- 300+Global Buyers Trust Us
- FlexibleMOQ by style and project