
Many enthusiasts hesitate to start their first DIY project because of the looming fear of ruining expensive, brand-name sneakers with a single clumsy brushstroke. It is deeply frustrating to spend a hundred dollars on premium materials only to watch your hard work crack, peel, or fade after just one afternoon of walking. This guide provides the professional blueprint you need to transform any pair of shoes into a durable, museum-quality masterpiece that stands the test of time.
To customize shoes successfully, you must chemically strip the factory finish, apply multiple thin layers of specialized acrylic leather paint, and seal the design with a high-performance top coat.
| Quick Steps Summary | Action Required |
|---|---|
| Step 1: Deglazing | Remove the factory wax using acetone or a leather preparer. |
| Step 2: Masking | Protect the soles and inner lining with high-quality painter’s tape. |
| Step 3: Base Coating | Apply a very thin, even layer of white or grey paint to provide a foundation. |
| Step 4: Layering | Paint your design using 3-5 ultra-thin coats, drying each with a heat gun. |
| Step 5: Finishing | Apply an acrylic finisher to protect against UV rays and physical abrasion. |
| Step 6: Curing | Allow the shoes to sit for 24-48 hours before wearing them outdoors. |
The Essential Toolkit: What Materials Do You Need to Customize Shoes?
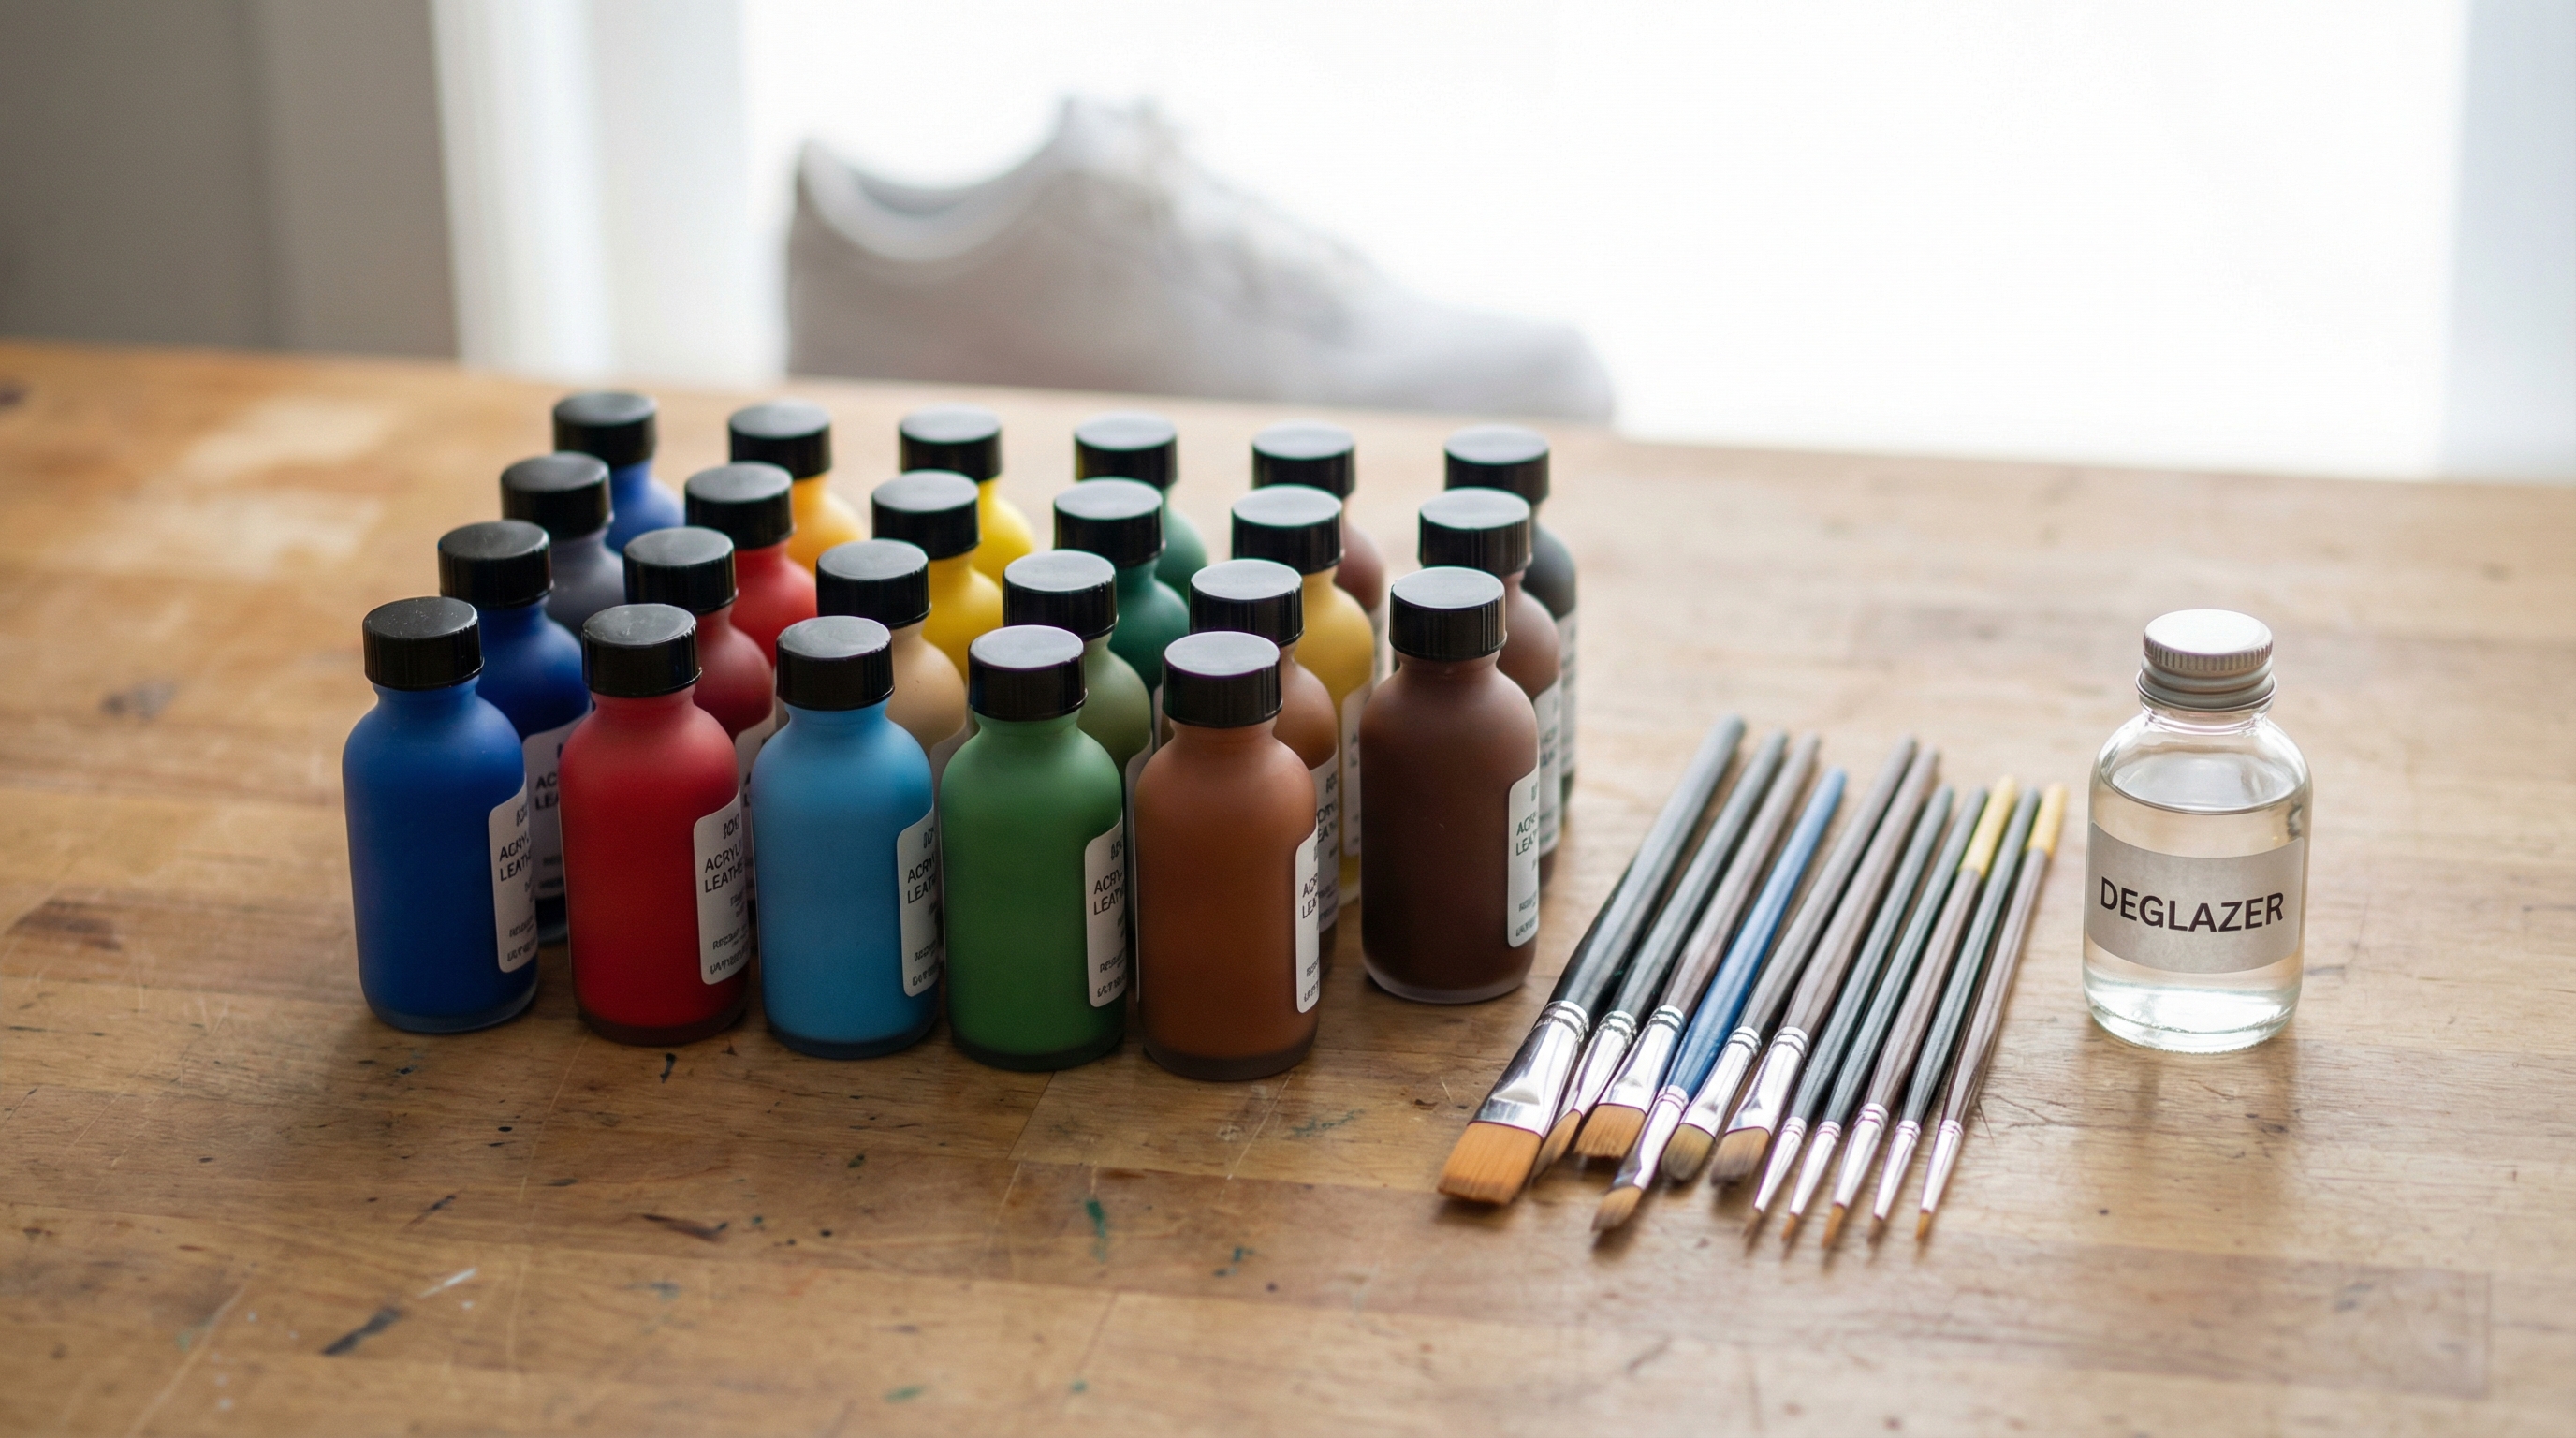
Before you touch your shoes, you must gather the correct chemical and artistic components required for a professional-grade finish. Most beginners make the mistake of using standard craft store acrylics, but these lack the flexibility needed for footwear that constantly bends during movement. You should invest in high-pigment acrylic leather paints which are specifically formulated to bond with leather fibers without losing their elasticity or vibrant color saturation over time.
Must-Have Paints and Brushes
Selecting the right brushes is just as critical as the paint itself because the stroke texture determines the final smoothness of your design. You will need a variety of synthetic brushes, ranging from wide flats for large panels to ultra-fine liners for intricate detail work and sharp edges. High-quality synthetic bristles are preferred over natural hair because they maintain their shape better when used with the thicker consistency of professional-grade leather paints.
Preparation Chemicals (Deglazers)
You cannot skip the preparation phase if you want your custom design to last longer than a week of regular use. A professional deglazer or high-strength acetone is necessary to break down the factory-applied clear coat that protects the original leather. Without this step, your new paint will simply sit on top of a slick wax layer, leading to immediate peeling the moment the shoe experiences any mechanical stress.
Precision Tools for Masking
Achieving those sharp, “factory-look” lines requires more than just a steady hand; it requires professional masking techniques and specialized tapes. Use high-adhesion painter’s tape specifically designed for delicate surfaces to ensure that no paint bleeds onto the rubber midsoles or fabric liners. Using a precision hobby knife allows you to trim the tape perfectly along the shoe’s seams, creating a professional boundary that separates your artwork from the untouched components.
But here’s the catch…
| Leather vs. Canvas Customization Comparison | Leather Customization | Canvas Customization |
|---|---|---|
| Primary Prep | Chemical Deglazing (Acetone) | Lint Removal & Light Cleaning |
| Paint Type | Specialized Leather Acrylic | Acrylic mixed with Fabric Medium |
| Flexibility | High (Requires thin layers) | Moderate (Absorbs into fibers) |
| Durability | High (Requires sealer) | Medium (Can fade over time) |
| Heat Setting | Recommended for drying | Mandatory for bonding |
Preparation is Key: How to Prep Leather and Canvas Without Damage?
Preparation is the silent hero of the shoe industry background that determines whether a custom pair looks amateur or professional. If the surface isn’t perfectly clean and porous, the molecular bond between the paint and the substrate will be weak and prone to failure. This stage is about transforming the shoe from a finished retail product back into a raw, receptive canvas that can hold new pigments indefinitely.
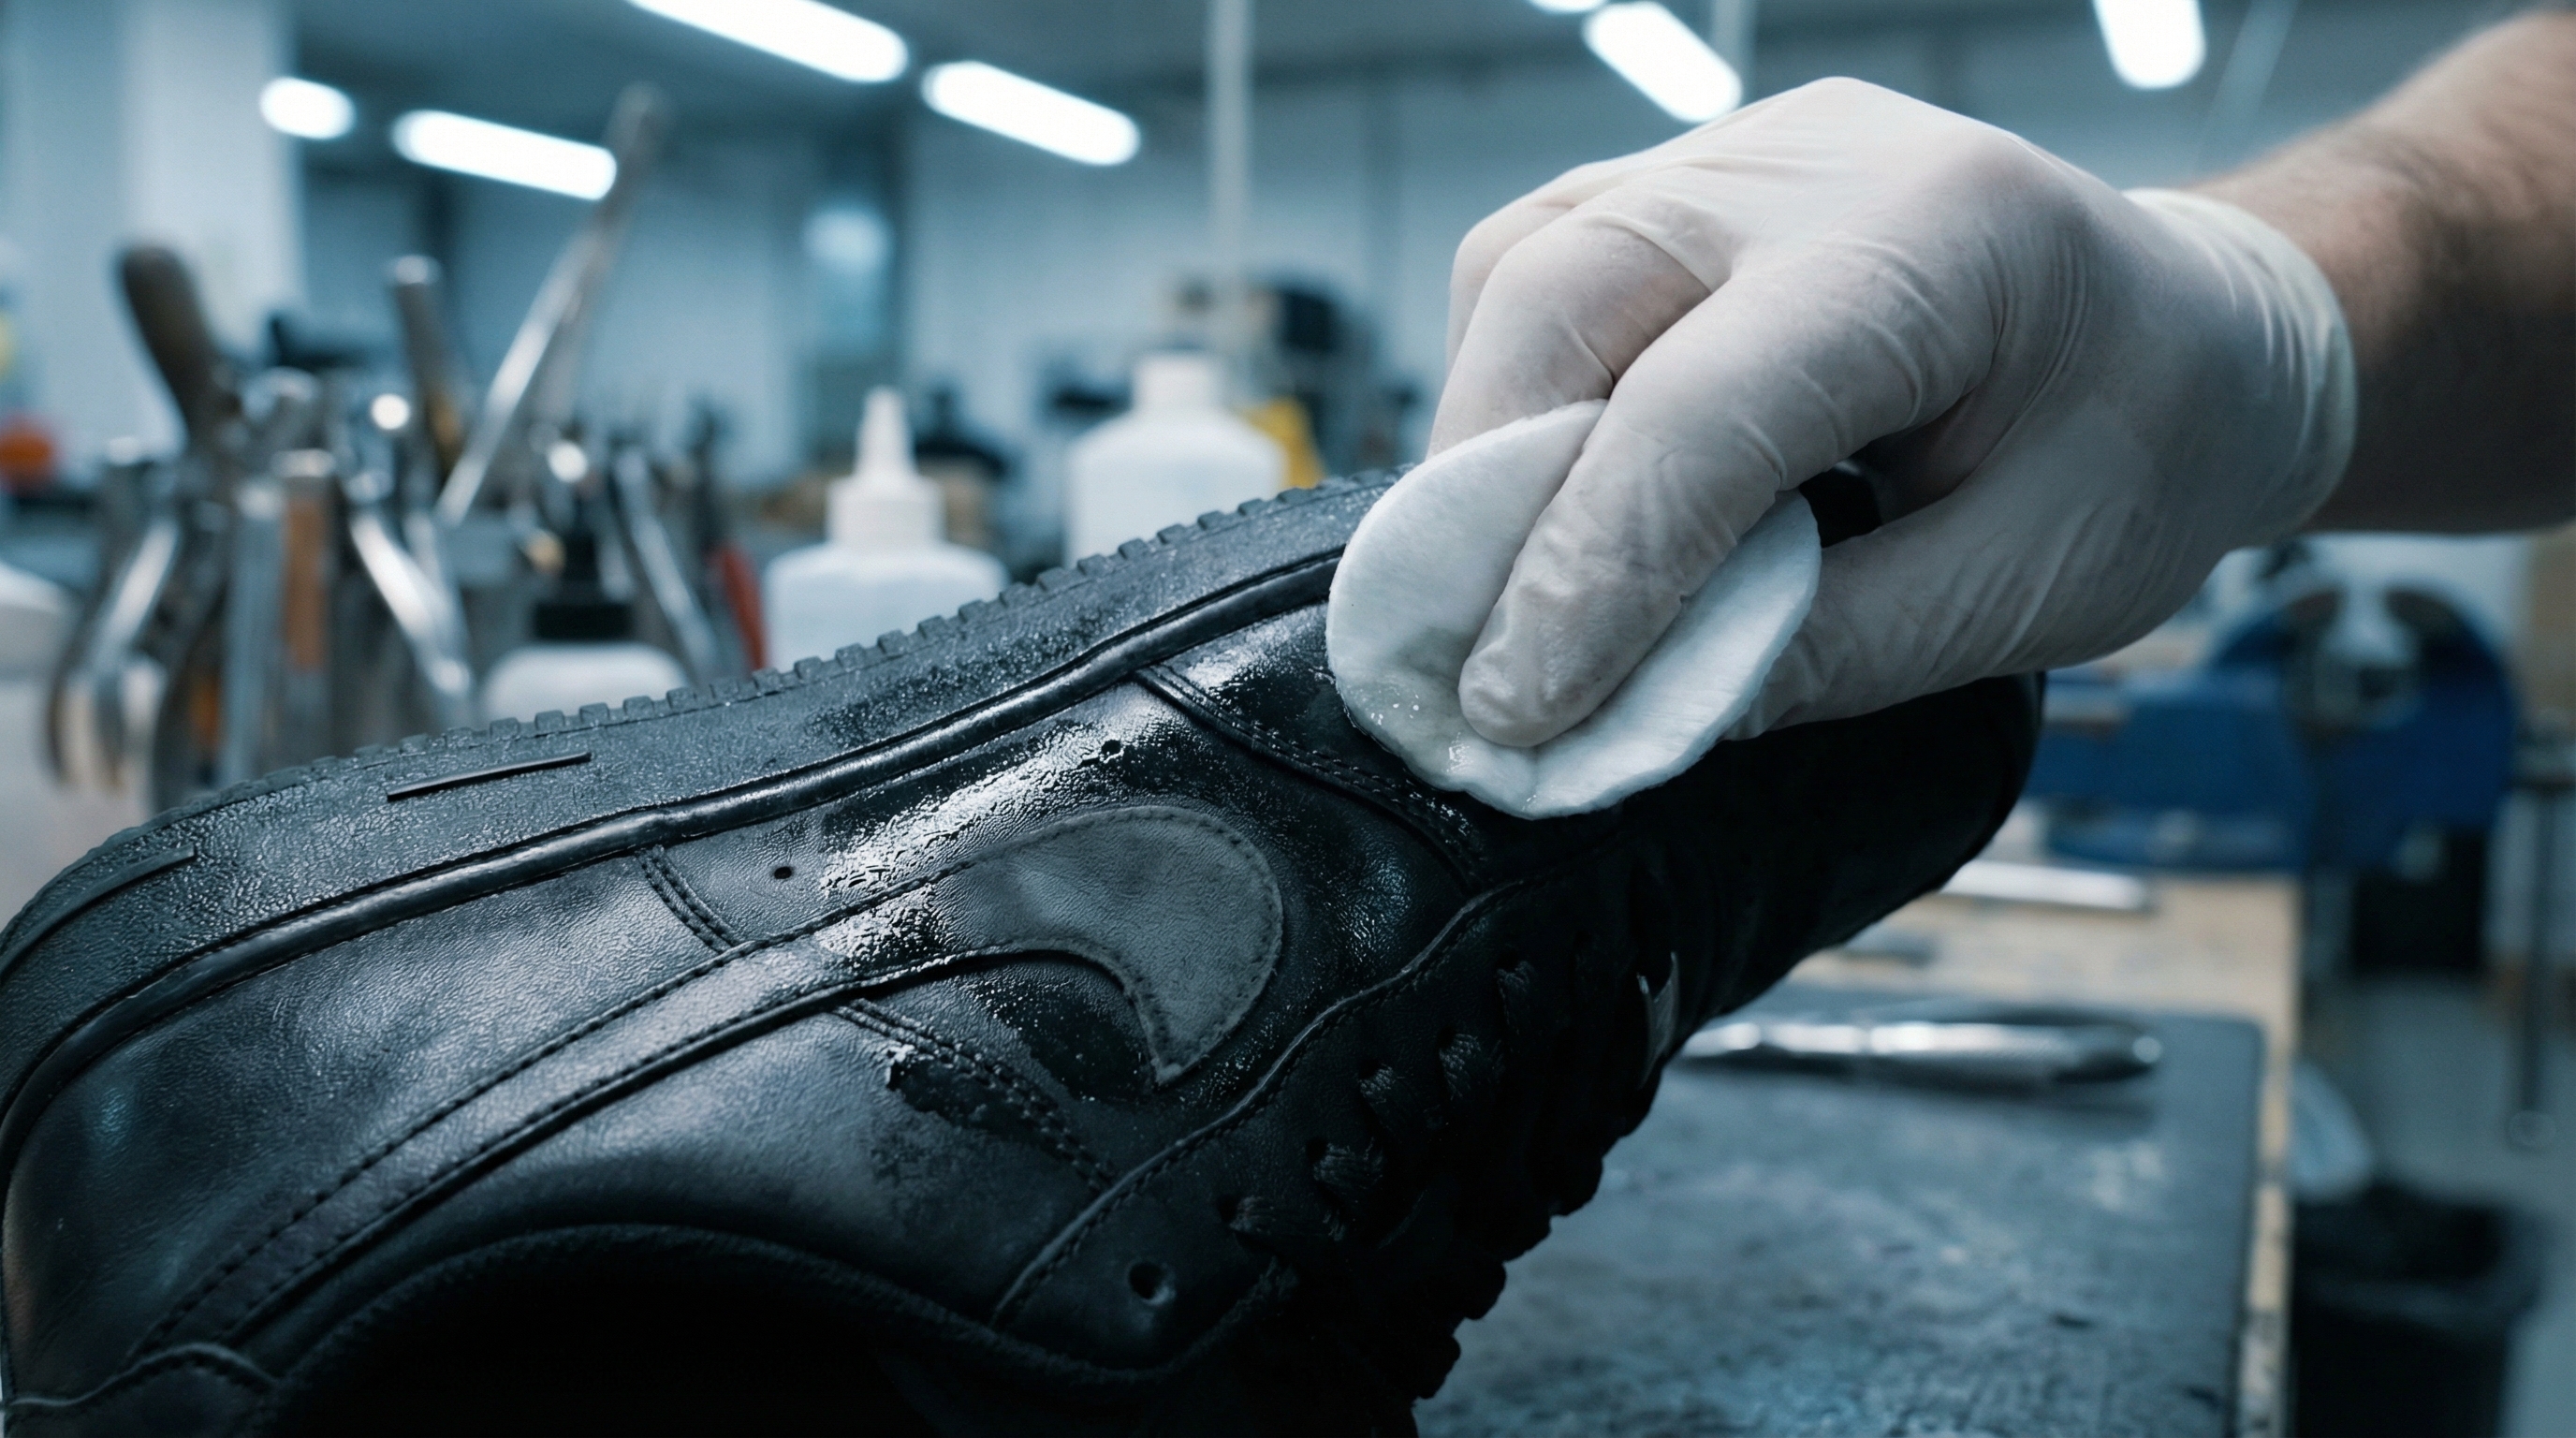
Stripping the Factory Finish
When you apply a deglazer, you are performing a chemical reaction that dissolves the polyurethane or acrylic top coat applied at the factory. You should use a lint-free cotton pad and rub the leather surface until the shine disappears and the material feels slightly tacky to the touch. This process opens up the “pores” of the leather, allowing the first layer of paint to penetrate the surface rather than sitting on top.
Masking Off the Soles and Liners
Protecting the areas you don’t want to paint is a tedious process, but it is the hallmark of a professional footwear manufacturer approach. Take your time to press the tape firmly into the crevices where the upper leather meets the rubber midsole to prevent any “capillary action” paint leaks. A clean midsole is the biggest indicator of quality, so double-checking your tape seals is a non-negotiable step for any serious artist.
Stuffing for Stability
A common mistake is trying to paint a shoe that keeps collapsing or shifting under the pressure of the paintbrush. Use plastic shoe trees or tightly packed microfiber towels to stuff the inside of the shoe until the toe box and side panels are firm and undistorted. This provides a solid resistance for your brush and ensures that you are painting the shoe in the shape it will actually hold while on a foot.
Wait, there’s more.
Manufacturer Pro Tip: The Physics of Adhesion
Industrial shoe finishing relies on a principle called “Interfacial Bonding.” When you deglaze a shoe, you are increasing the surface energy of the substrate. This allows the liquid paint to “wet” the surface more effectively. If the surface energy of the leather is lower than the surface tension of the paint, the paint will bead up and fail to adhere, leading to the cracking that plagues most DIY projects.
The Master Class: Step-by-Step Guide to Painting Your Sneakers
Once the prep work is finished, you are ready to begin the most rewarding part of the process: applying the color. This stage requires patience and a “less is more” mentality, as the most common cause of failure is applying paint too thickly. By building your design through a series of transparent layers, you ensure that the paint remains flexible enough to move with the natural creases of the leather.
Applying the Base Coat
Start with a neutral base coat, usually white or light grey, regardless of what your final color scheme will be for the design. This base coat acts as a primer that covers the original shoe color and provides a consistent brightness for all subsequent layers of paint. Even if the original shoe is white, a fresh “factory white” base coat ensures that your custom colors will adhere with maximum chemical compatibility.
Building Color with Thin Layers
The secret to a crack-free finish is applying four to five ultra-thin coats rather than one or two thick, heavy ones. Each layer should be so thin that it looks somewhat streaky and translucent after the first application; don’t worry, the opacity will build up naturally. Use a heat gun on a low setting to dry each layer for about 30 seconds before applying the next, which helps the paint “set” and prevents smudging.
Blending and Gradient Techniques
To achieve professional gradients or “fades,” you must work quickly while the paint is still slightly damp or use a retarder to slow drying. Soft-bristle brushes are essential here for buffing the transition lines between two colors until they disappear into a seamless, ethereal wash of pigment. If you are struggling with brush strokes, adding a small amount of “thinning” medium can help the paint level out more smoothly across the panel.
Now for the fun part.
| Drying Time Matrix | Surface Temperature | Air Drying Time | Heat Gun (Low) |
|---|---|---|---|
| Thin Layer | 70°F (21°C) | 15 – 20 Minutes | 30 – 60 Seconds |
| Medium Layer | 70°F (21°C) | 30 – 45 Minutes | 2 – 3 Minutes |
| Detail Work | 70°F (21°C) | 10 – 15 Minutes | 20 Seconds |
| Final Cure | Room Temp | 24 – 48 Hours | Not Recommended |
Specialty Surfaces: How to Handle Mesh, Suede, and Fabric?
While leather is the standard for customization, many modern sneakers feature a complex mix of mesh, suede, and synthetic textiles. Each of these materials reacts differently to moisture and pigment, requiring specific additives to ensure the paint doesn’t turn the soft fabric into a hard, plastic-like shell. Mastering these diverse textures will allow you to customize a wider range of high-performance athletic footwear and lifestyle sneakers.
Using Fabric Mediums (2-Soft)
When painting on mesh or canvas, you must mix your acrylic paint with a fabric medium, often referred to in the industry as “2-Soft.” This additive thins the paint and allows it to soak into the fibers of the fabric rather than drying on top of them like a layer of rubber. After applying the paint-medium mixture, you must heat-set the fabric with a heat gun at 300°F to chemically lock the pigment into the textile fibers.
Protecting the Texture of Suede
Suede and nubuck are the most difficult materials to customize because they have a “nap” or a fuzzy texture that is easily ruined by thick paint. Instead of traditional acrylics, use specialized suede dyes which penetrate the hide without clogging the fibers or changing the soft hand-feel of the material. After dyeing, use a stiff suede brush to “comb” the nap back and forth, ensuring the fibers don’t stick together as the dye dries.
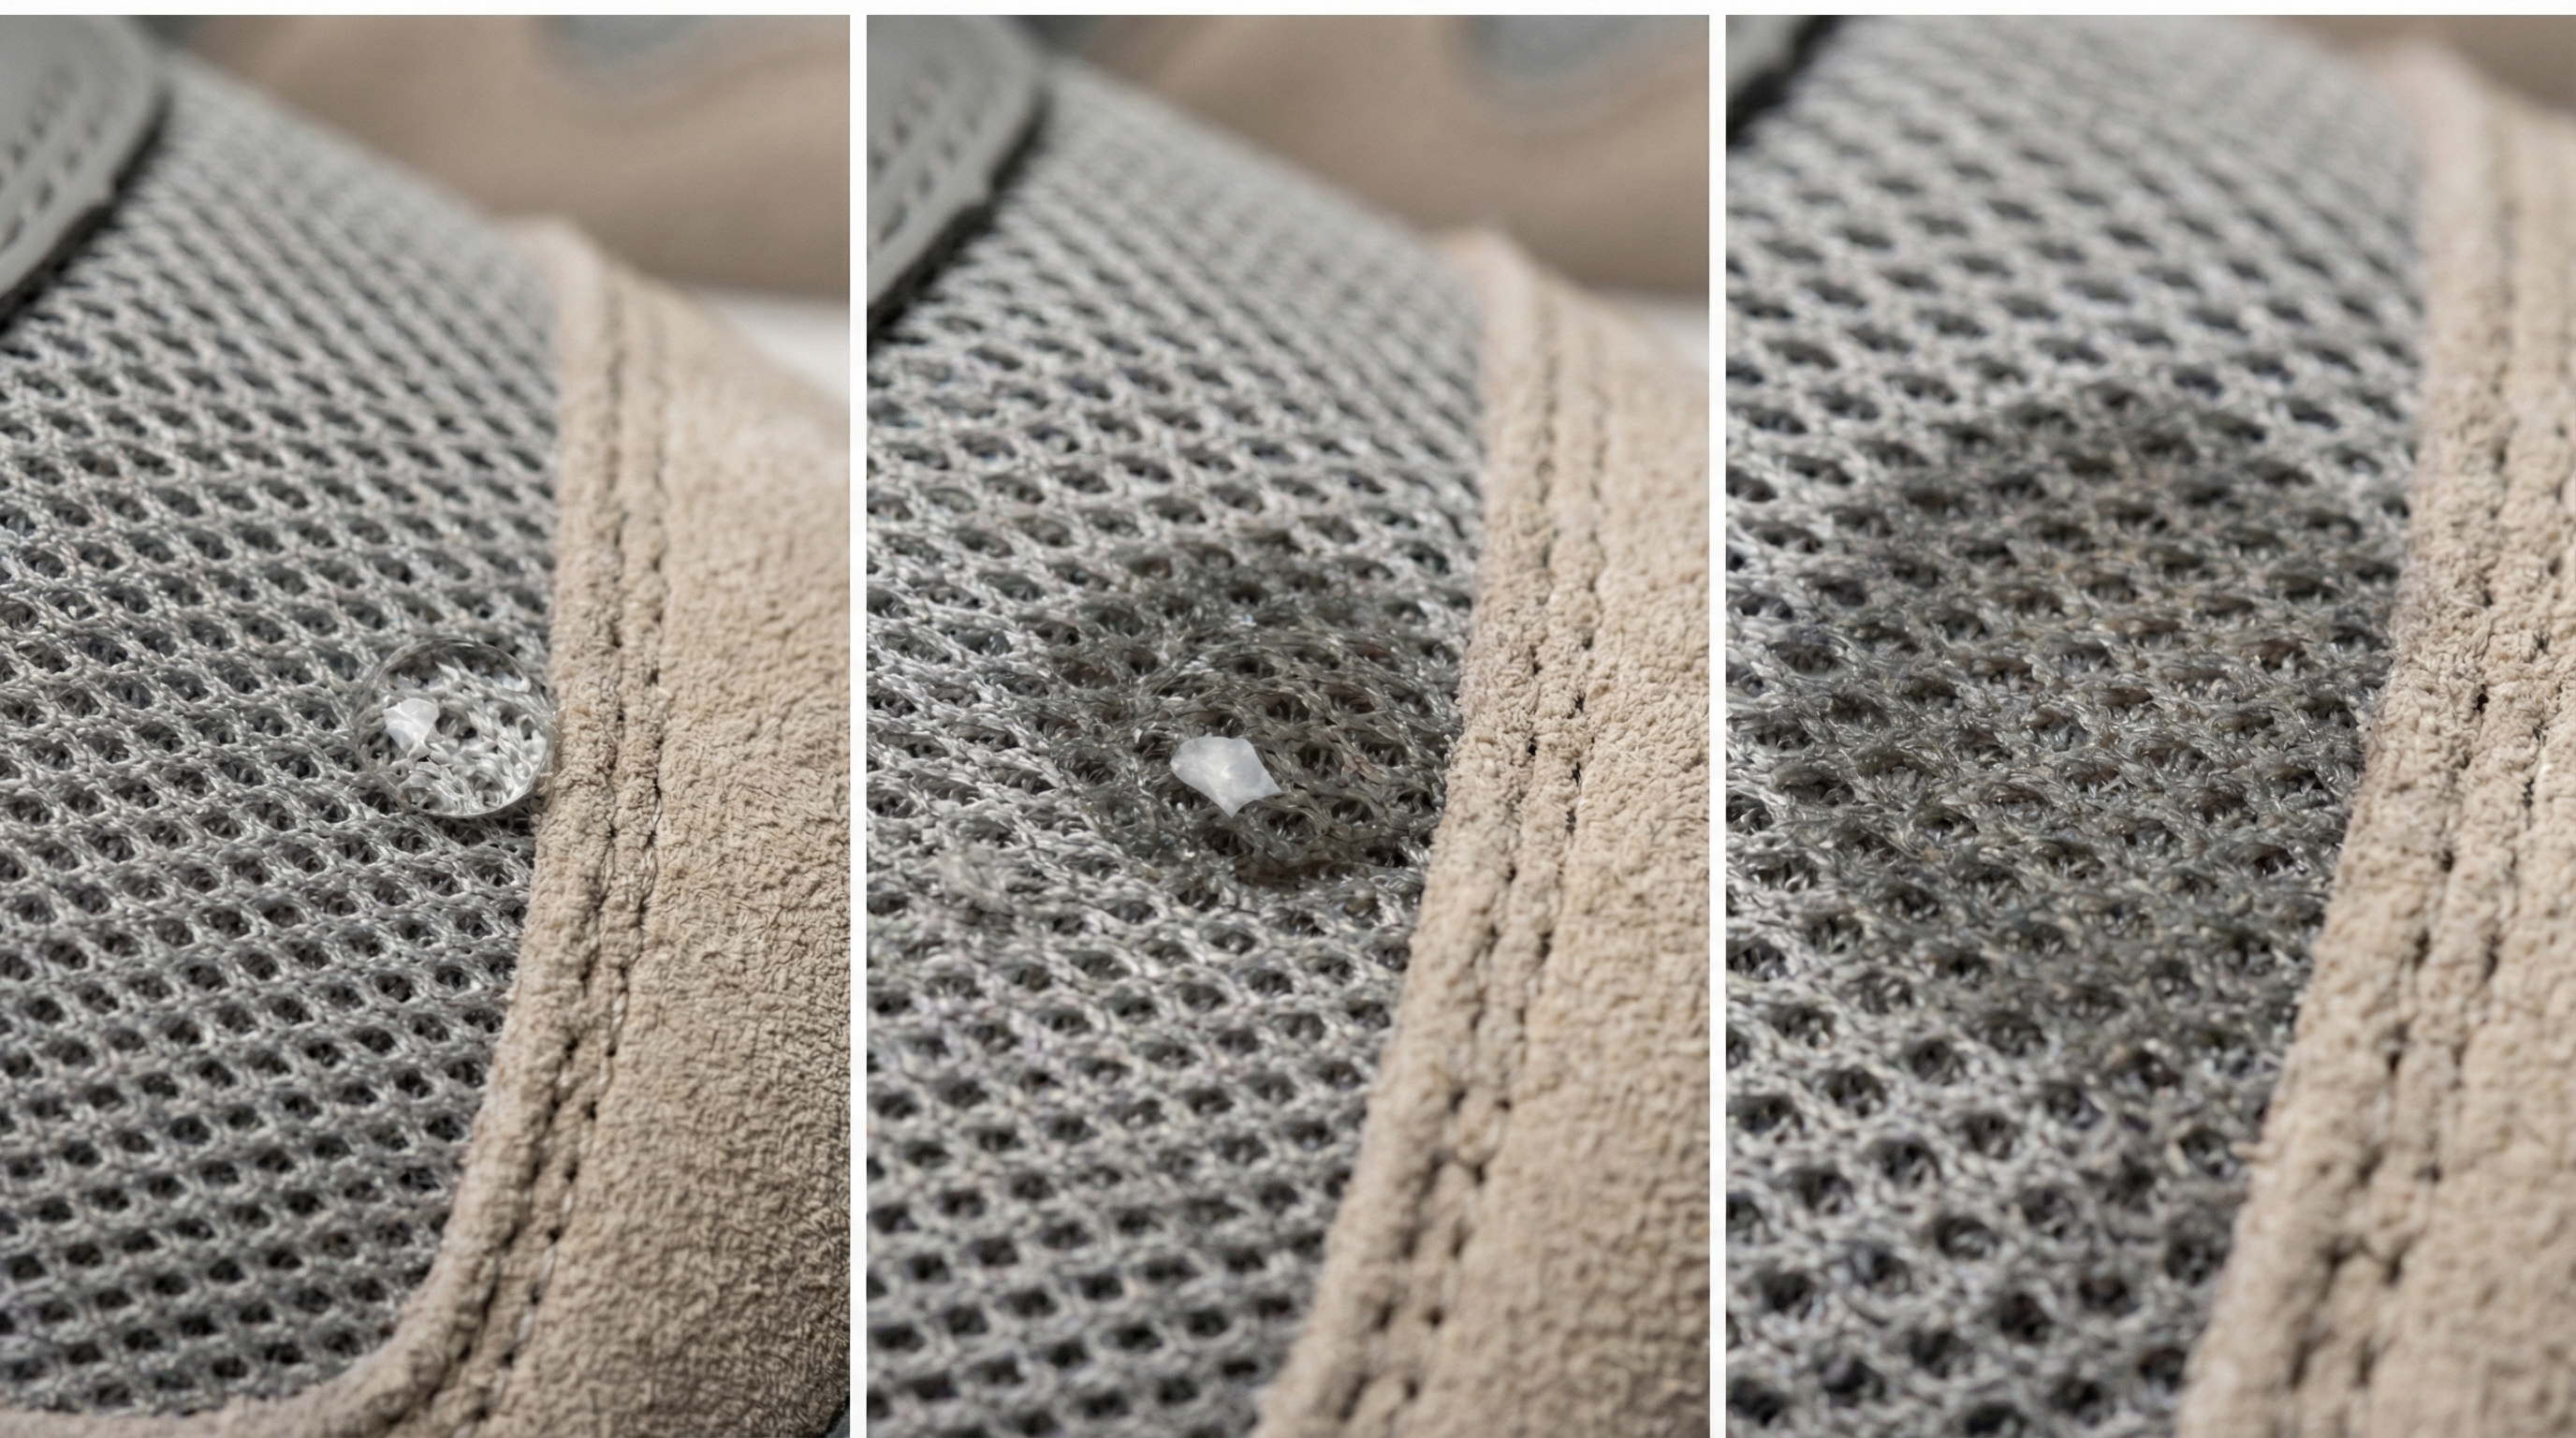
Preventing Bleeding on Mesh
One of the biggest challenges with mesh is “wicking,” where the liquid paint travels along the fibers and bleeds into areas where it wasn’t intended to go. To prevent this, apply your paint in very dry brush strokes and avoid over-saturating the material with too much liquid at once. You can also apply a “blocker” or a clear medium around the edges of your design to act as a dam that keeps the colored pigments contained.
But what if you want to go even further?
Advanced Customization: Using Stencils, Airbrushes, and Hydropaint
Once you have mastered basic brushwork, you might want to explore advanced techniques that offer a level of precision and texture impossible to achieve by hand. These methods are often used by those looking to start a small business or produce “1-of-1” designs that look like they came straight from a quality footwear website. Transitioning to airbrushes and stencils significantly reduces the visible brush strokes and creates a much more uniform finish.
Creating Custom Stencils with Vinyl
Using a vinyl cutter to create custom stencils allows you to apply incredibly complex logos, patterns, or typography with surgical precision. The key is to ensure the vinyl is pressed firmly into the leather’s grain so that paint doesn’t leak under the edges during application. For the best results, use “low-tack” vinyl that won’t pull up your base coat when you remove the stencil after the paint has dried.
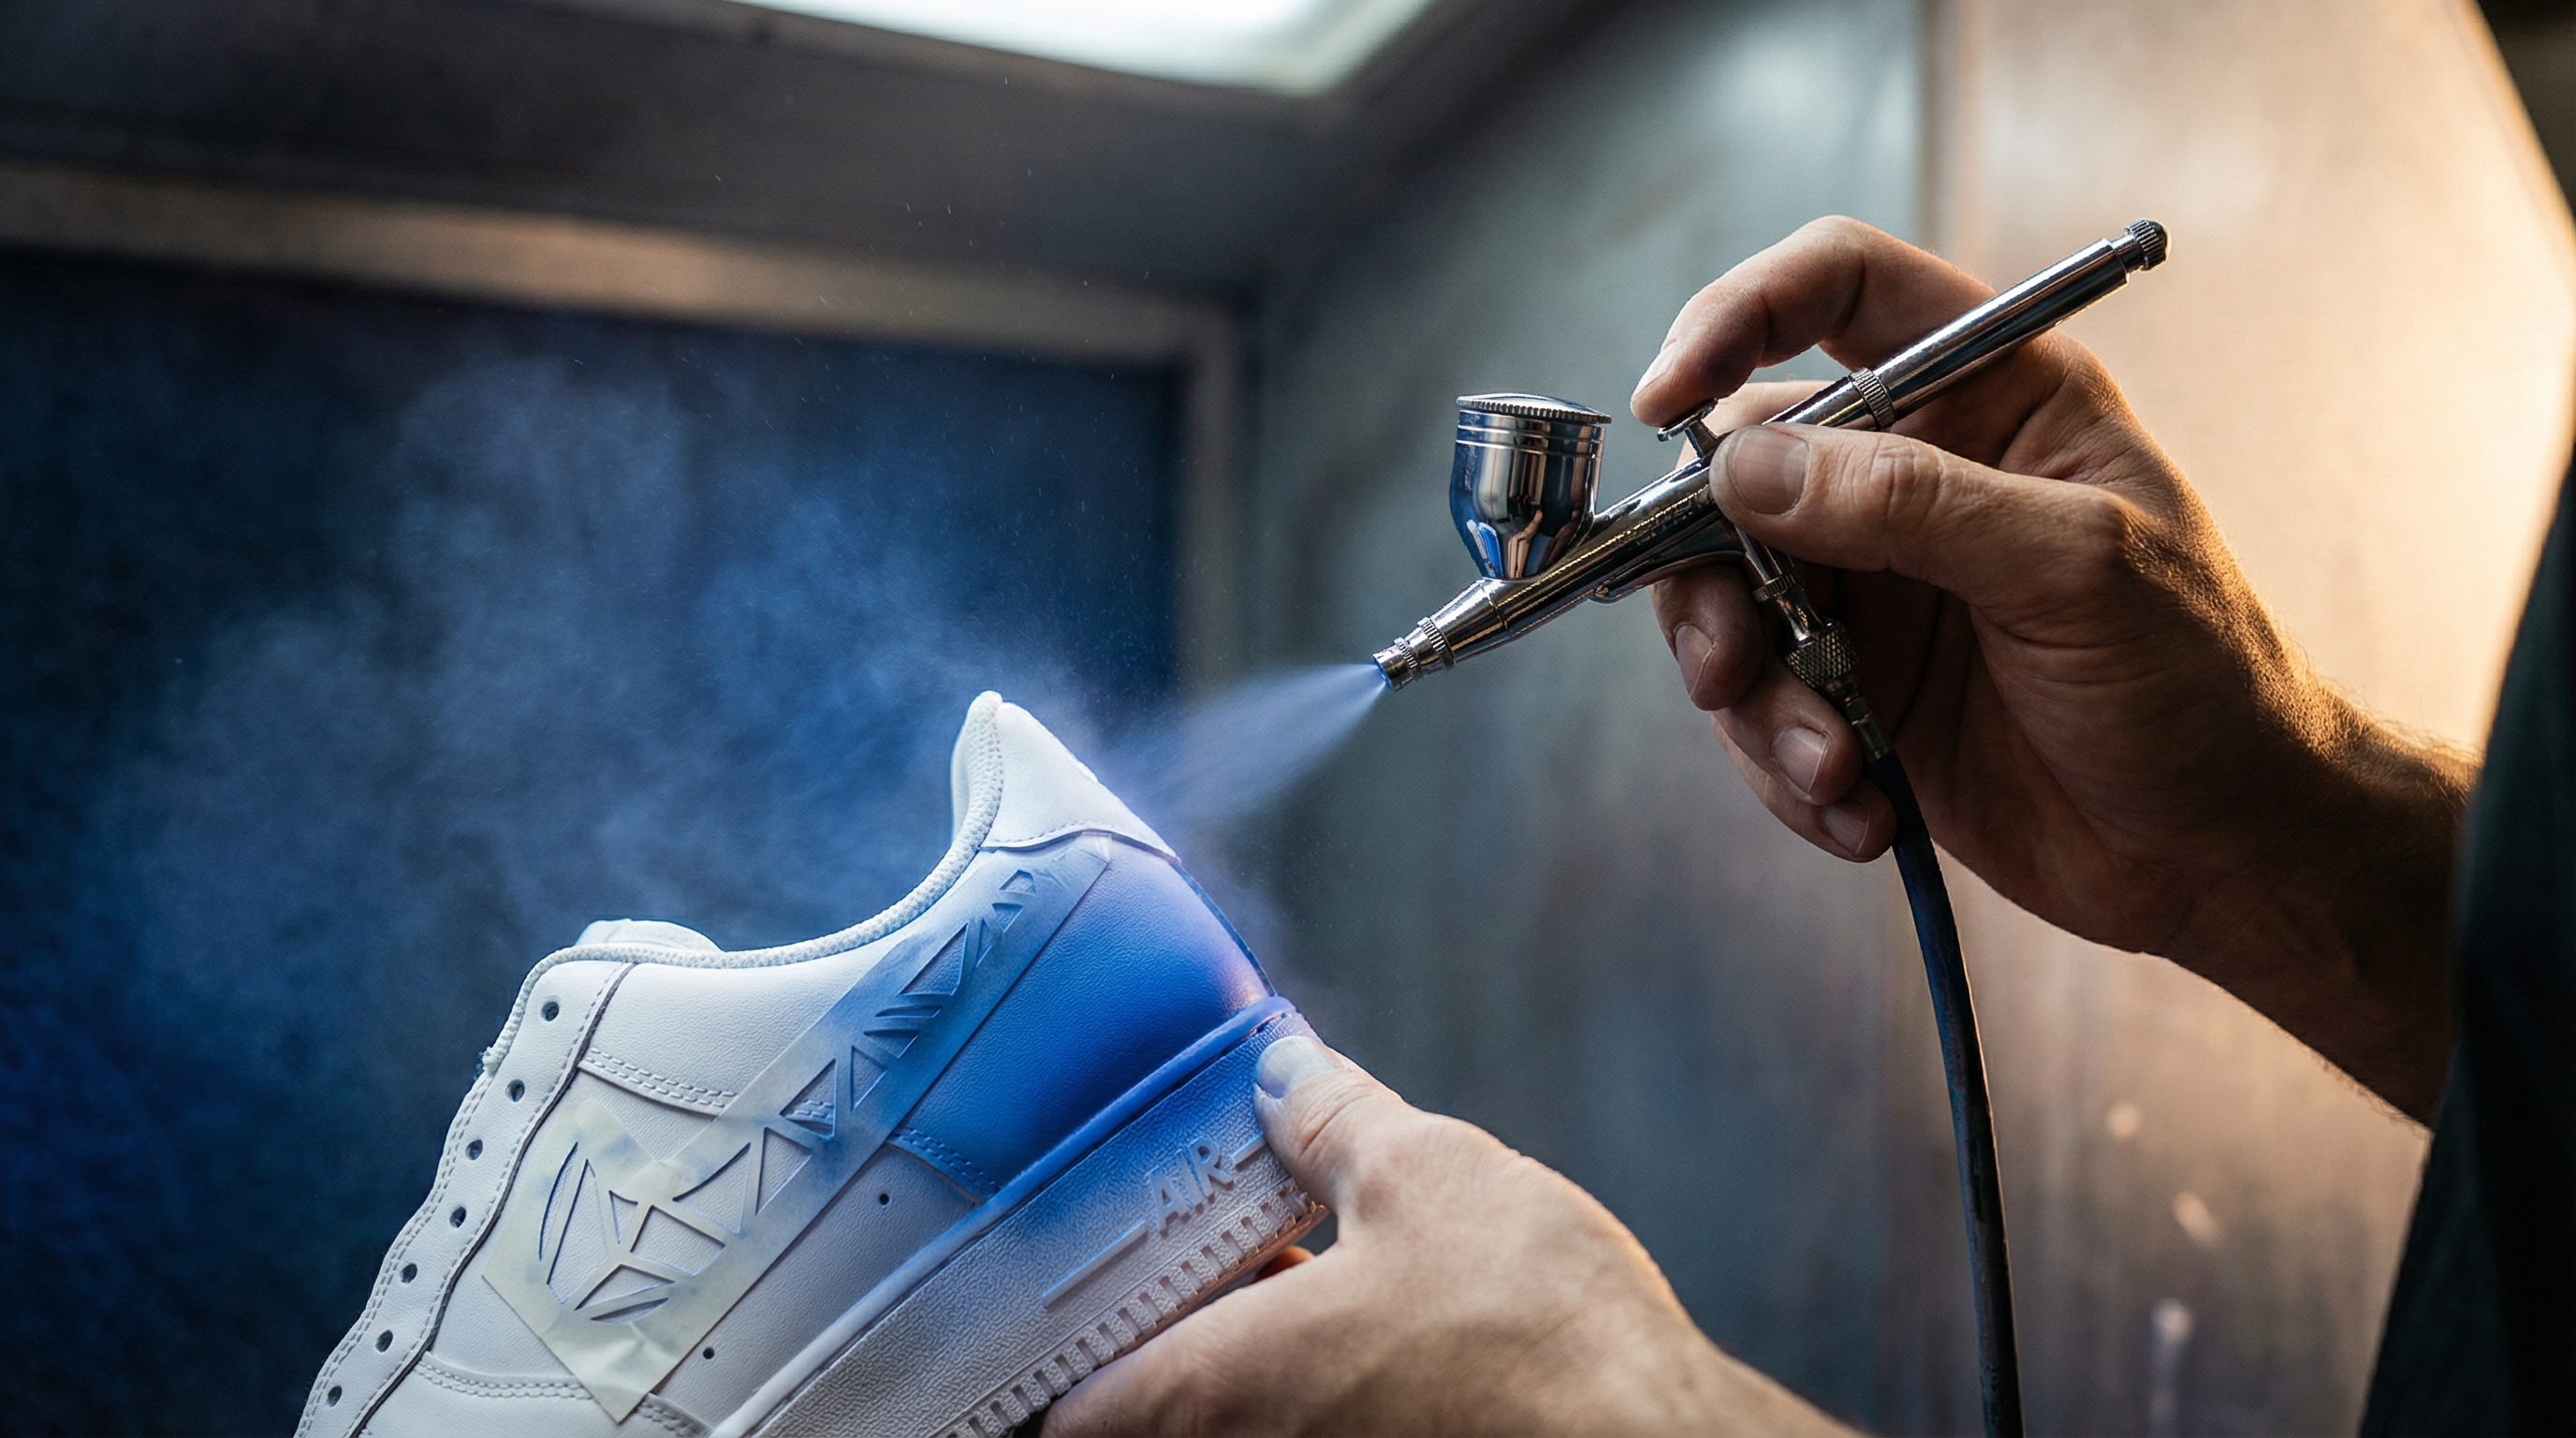
Achieving Professional Finishes with Airbrushing
Airbrushing is the gold standard for professional customizers because it applies paint in a fine mist, resulting in a perfectly flat and even surface. You must thin your paint to the consistency of milk using a specialized airbrush thinner to prevent the nozzle from clogging during the session. Airbrushing also allows for advanced “drop shadows” and 3D effects that give your custom sneakers a professional, high-end aesthetic.
Hydro-dipping for Abstract Patterns
Hydro-dipping involves floating high-quality paints on the surface of a water bath and then dipping the shoe through the film to create marble-like patterns. While this technique is visually stunning, it requires immense preparation to mask off the entire shoe except for the specific areas intended for the pattern. It is an excellent way to add abstract, organic textures to midsoles or side panels that would be impossible to paint by hand.
It gets even better…
Manufacturer Pro Tip: UV Curing vs. Air Drying
In mass-market production, finishes are often cured using Ultra-Violet (UV) light. This triggers a nearly instantaneous polymerization of the top coat, creating a much harder and more scratch-resistant surface than air-dried acrylics. For the DIYer, while UV lamps are accessible, “curing” is best simulated by allowing the shoe to sit in a dry, room-temperature environment for at least 48 hours to allow the cross-linking of molecules to complete.
The Final Touch: How to Seal Your Design for Long-Lasting Durability?
The most common reason for custom shoe failure is a lack of proper sealing, which leaves the paint vulnerable to moisture, dirt, and UV degradation. Applying a finisher is not just about choosing a “look”; it is about creating a chemical barrier that absorbs the impact and friction of daily wear. A well-applied sealer will make the difference between a shoe that lasts a month and one that stays vibrant for years.
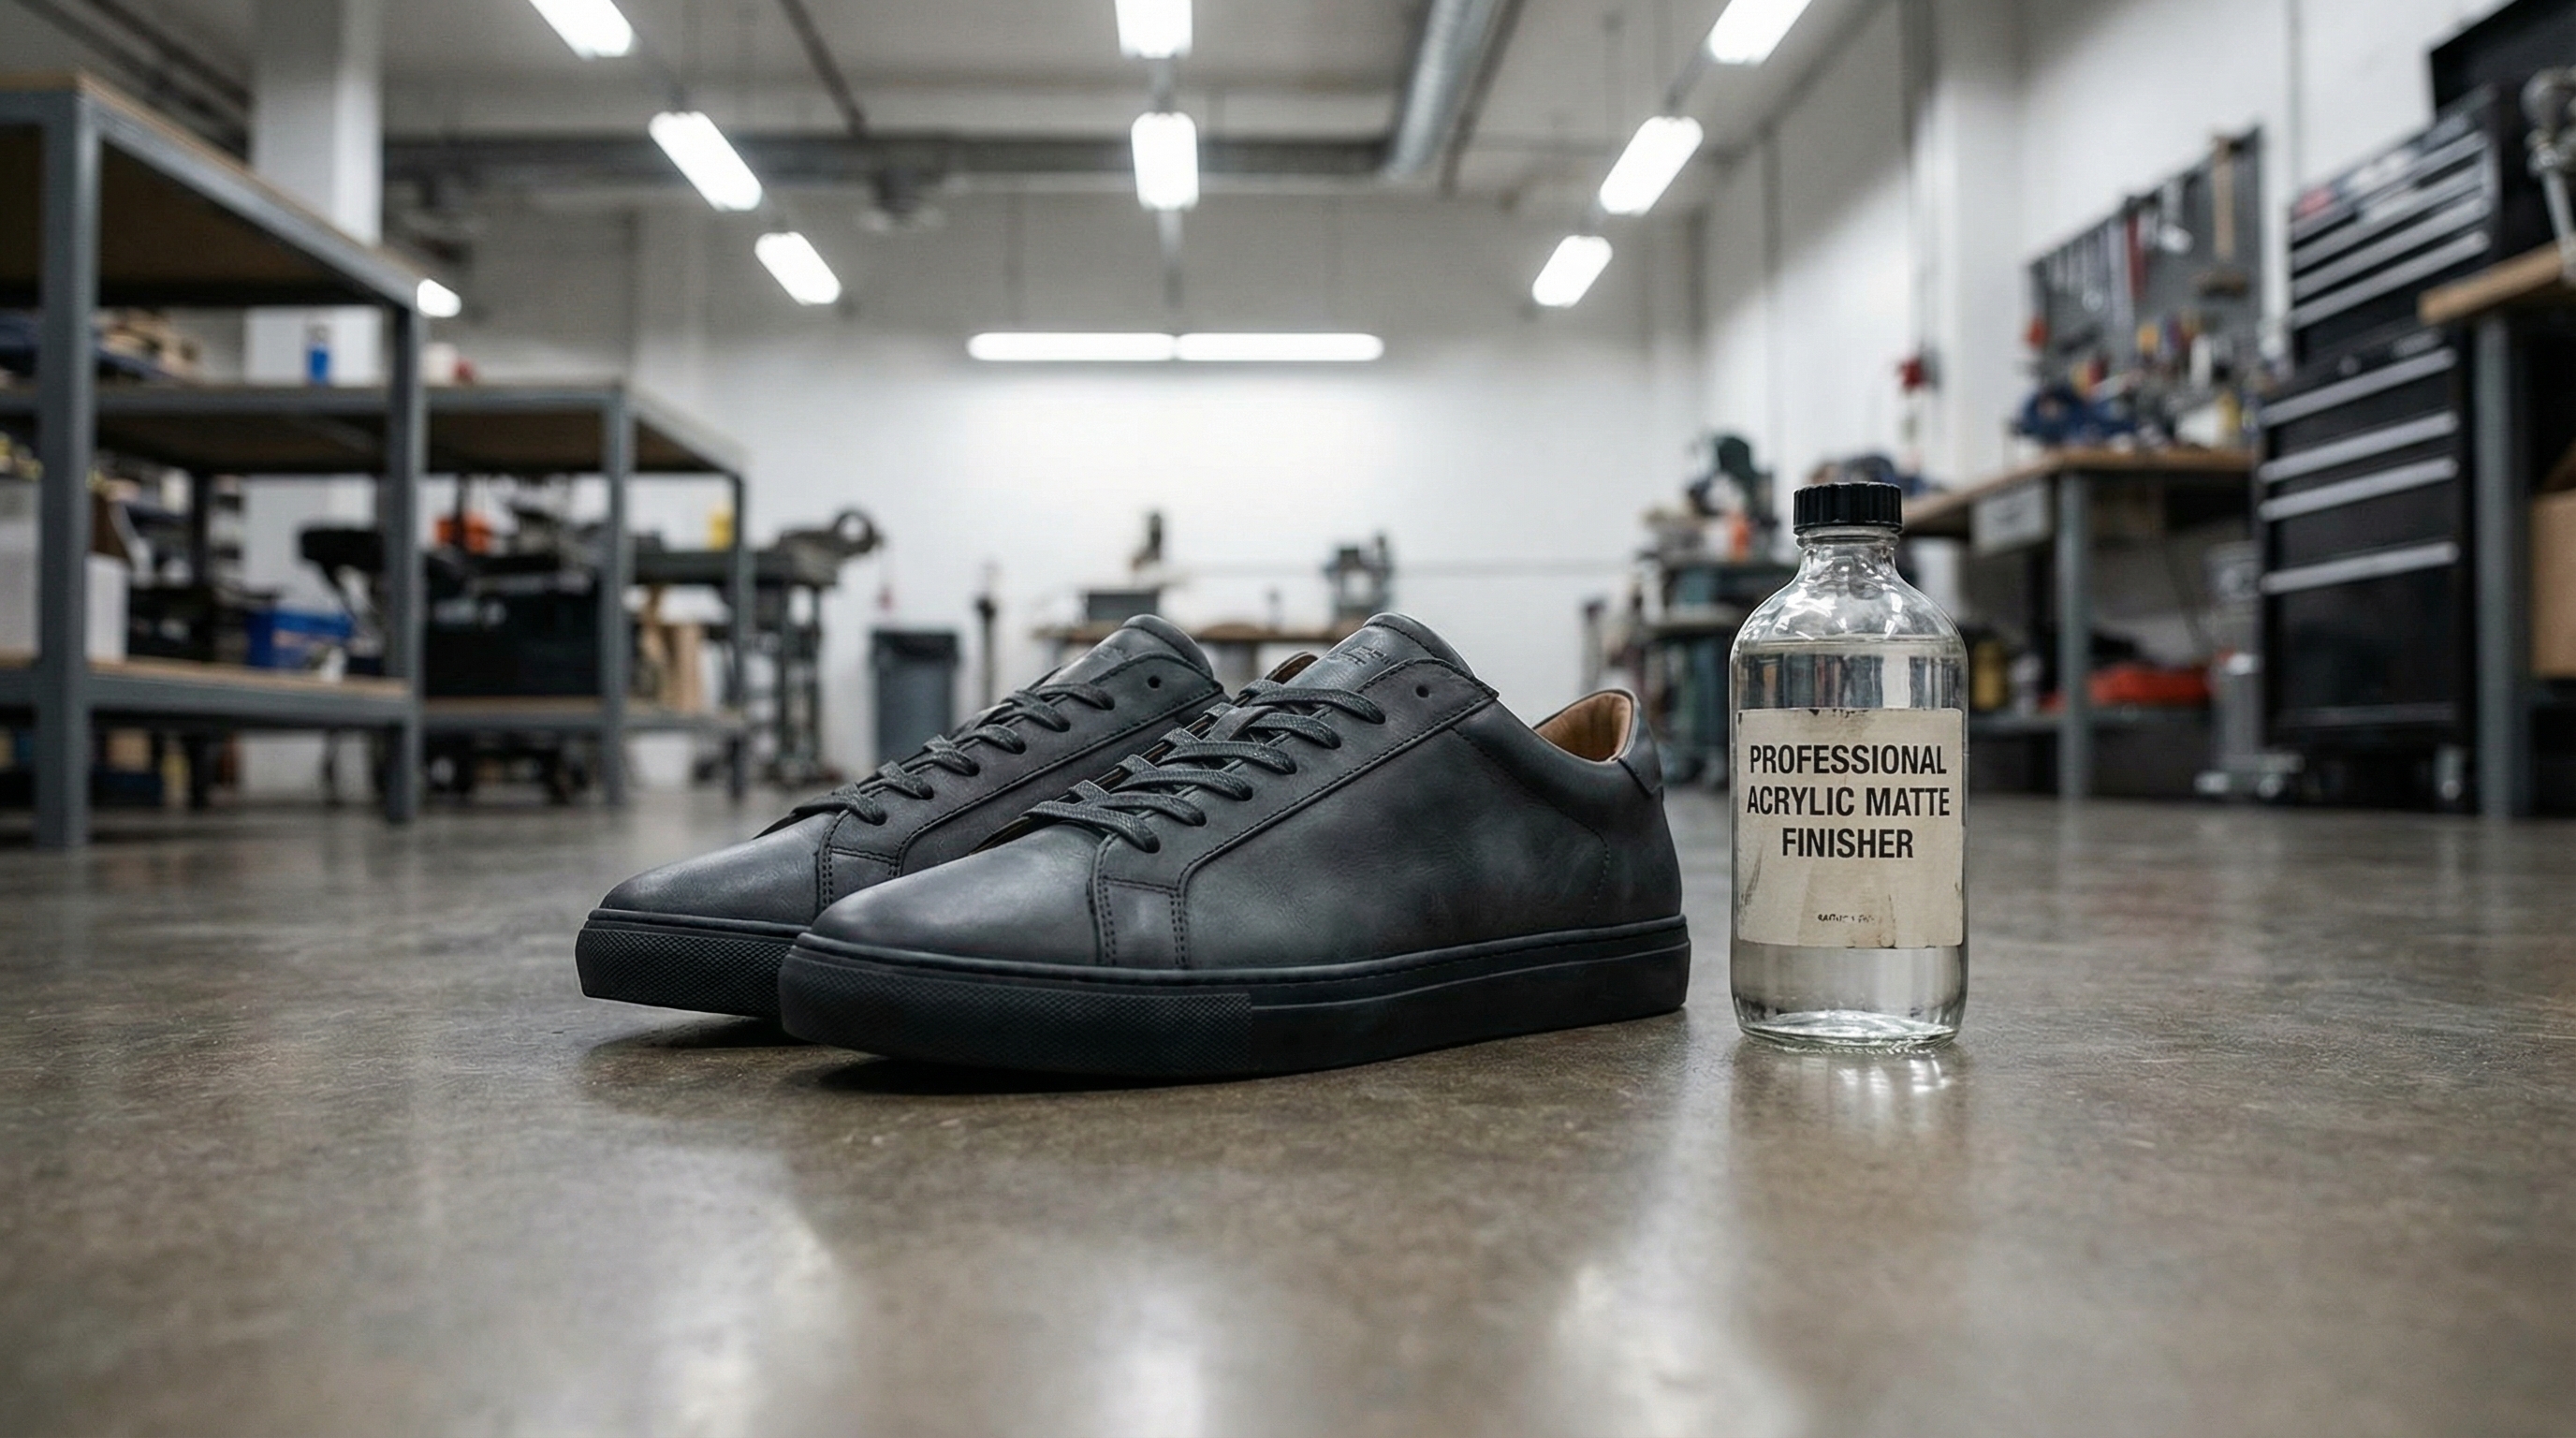
Choosing Between Matte and Glossy Finishers
The choice of finisher should depend on the original aesthetic of the shoe and the “vibe” of your custom design. A matte finisher is often preferred for modern sneakers as it mimics the original factory look and hides minor imperfections in the paintwork. Conversely, a glossy or “high-gloss” finisher can make colors pop and is perfect for “patent leather” looks or high-contrast artistic designs that need to stand out.
The Correct Way to Apply Top Coats
When applying your finisher, use long, even strokes and try to avoid going over the same area multiple times, which can cause the sealer to become cloudy. You only need one or two thin layers of finisher to provide adequate protection; over-applying can lead to a thick, “plastic” appearance that may eventually crack. Ensure the paint underneath is 100% dry before sealing, as trapped moisture can cause the finisher to bubble or peel away.
Curing Time and Weatherproofing
Curing is different from drying; while the shoe may feel dry to the touch in an hour, the chemical bonding process takes much longer to finalize. You should wait at least 24 to 48 hours before exposing your customized shoes to the elements or high-stress activities like running or sports. For added protection, you can apply a specialized water-repellent spray over the cured finisher to provide an extra layer of defense against rain and stains.
Why does this matter?
| Finisher Durability Chart | Scratch Resistance | Water Resistance | Flex Stability |
|---|---|---|---|
| Matte Acrylic | High | Moderate | Excellent |
| Satin / Semi-Gloss | High | High | Good |
| High Gloss | Moderate | Very High | Fair |
| UV-Resistant Spray | Moderate | Excellent | N/A |
Creative Inspiration: 2026 Shoe Customization Trends to Watch
As we look toward 2026, the world of shoe customization is shifting away from simple color-blocking toward more experimental and “main character” aesthetics. The trend is moving toward shoes that serve as the centerpiece of an outfit rather than a subtle accessory. Understanding these emerging styles will help you create designs that are not only technically sound but also culturally relevant and fashion-forward.
“Main Character” Color Palettes
The 2026 trend cycle is dominated by “Main Character” palettes—bold, high-saturation colors like electric cobalt, molten orange, and cyber-lime. These designs often use high-contrast combinations that draw the eye immediately to the feet, reflecting a broader cultural shift toward maximalism and individual expression. Integrating these vibrant colors with stark white or deep black accents creates a visual “pop” that is highly effective for social media and street style.
Sculptural and 3D Embellishments
Customizers are increasingly moving beyond 2D painting and into the realm of 3D modifications, using flexible clays and 3D-printed attachments to alter the shoe’s silhouette. From adding “fins” to the heels to creating embossed textures on the side panels, these modifications turn sneakers into wearable sculptures. When adding 3D elements, it is vital to use industrial-strength flexible adhesives that can withstand the constant torque and movement of the shoe during walking.
Metallic and Silver Shine Revivals
Silver and chrome finishes are making a massive comeback, inspired by 2000s-era futurism and high-tech industrial design. Achieving a realistic metallic shine requires specialized “chrome” paints or silver leafing techniques that must be sealed with a specific high-gloss finisher to maintain their reflective properties. These metallic accents are often paired with “distressed” or “aged” midsoles to create a compelling contrast between futuristic materials and vintage aesthetics.
Let’s look at the long-term view.
Maintenance and Care: How to Wash Customized Shoes Safely?
The longevity of your custom project depends heavily on how you treat the shoes once they enter your regular rotation. Even the best paint job can be compromised by aggressive cleaning chemicals or improper storage conditions. By following a strict maintenance protocol, you can ensure that your artistic investment remains in pristine condition for as long as possible.
Hand Washing vs. Machine Myths
You should never, under any circumstances, put customized shoes in a washing machine, as the heat and mechanical agitation will almost certainly cause the paint to crack. Instead, use a soft microfiber cloth and a gentle, pH-balanced sneaker cleaner to spot-clean any dirt or debris. Gently circular motions are usually enough to lift surface stains without compromising the integrity of the acrylic finisher or the underlying paint layers.
Quick Touch-ups for Scuff Marks
Despite your best efforts, scuff marks are an inevitable part of wearing shoes; however, they are easy to fix if you have kept a small amount of your original paint. Keep your custom colors in small, airtight jars so you can quickly dab a tiny amount of paint onto a scratch with a fine-detail brush. After the touch-up, re-apply a small amount of finisher to the area to ensure the repair is just as durable as the rest of the shoe.
Storage Tips to Prevent Cracking
When you aren’t wearing your customs, store them in a cool, dry place away from direct sunlight, which can cause pigments to fade and the leather to dry out. Using shoe trees is highly recommended for customized footwear because they maintain the tension of the leather, preventing the deep creases that eventually lead to paint failure. Proper storage essentially “rests” the materials, ensuring the bond between the paint and the leather remains stable over years of use.
*
People Also Ask (FAQ)
What is the best paint for customizing sneakers at home?
The industry standard for home customization is high-quality acrylic leather paint, such as Angelus or similar professional brands. These paints are specifically designed to be flexible and water-resistant, making them far superior to standard craft paints which will crack upon the first wear. For fabric or mesh sections, always mix your acrylics with a fabric medium to maintain the softness of the material.
Will the paint crack or peel after wearing?
Paint will only crack or peel if the preparation steps were ignored or if the paint was applied in layers that were too thick. If you properly deglaze the factory finish and apply 3-5 ultra-thin coats, the paint becomes a part of the leather and will flex naturally with your foot. High-stress areas like the toe box crease require the most attention during the “thin layer” application process.
Can I customize shoes that aren’t white?
Yes, you can customize shoes of any color, but you will need to apply a neutral base coat first to ensure your new colors are vibrant. If you are painting a light color over a dark shoe, you may need 2-3 layers of a white or light grey “blocker” coat before your final color will show up accurately. This prevents the original dark pigment from bleeding through your new design.
How long does it take to customize a pair of shoes?
A high-quality custom job typically takes between 5 to 10 hours of active labor, depending on the complexity of the design and the amount of masking required. This does not include the essential drying time between coats or the final 48-hour curing period. Rushing the process is the most common reason for mistakes, so it is best to spread the project over several days.
Is it necessary to use a heat gun?
While not strictly mandatory, a heat gun is highly recommended because it speeds up the drying process and helps “set” the paint between layers. Using heat allows the paint to bond more effectively and ensures that the surface is dry enough for the next layer without the risk of smearing. If you don’t have a heat gun, a standard hair dryer on a low, warm setting can serve as a functional substitute.
Can I use regular craft acrylic paint on leather shoes?
You should never use regular craft acrylics on leather because they are too rigid once dry. Regular acrylics are designed for static surfaces like canvas or wood; on a moving shoe, they will become brittle and flake off within minutes of walking. Always use paints labeled specifically for “Leather” or “Footwear” to ensure they contain the necessary plasticizers for flexibility.
For more advanced material guides or technical specs, feel free to contact our experts.