
Drawing shoes is often cited by artists as one of the most frustrating challenges in character design. Have you ever finished a brilliant character sketch, only to find that the feet look like flat, shapeless blocks? It is incredibly disheartening to see a dynamic pose ruined by footwear that lacks structure, volume, or realistic perspective. You are not alone; the complex curves and rigid materials of shoes make them a unique hurdle for beginners and intermediate artists alike.
Fortunately, mastering footwear isn’t about memorizing every stitch—it’s about understanding the underlying “wedge” and layering details on top. By breaking down shoes into manageable geometric shapes, you can draw everything from sleek stilettos to chunky basketball sneakers with confidence.
Quick Summary: How to Draw a Shoe in 5 Steps
- Sketch the Wedge: Draw a basic 3D triangle/wedge shape to represent the foot’s volume.
- Define the Sole: Add a flat layer at the bottom that follows the perspective of the ground.
- Outline the Opening: Draw the collar (where the foot enters) and the tongue.
- Map the Panels: Add the toe cap, heel counter, and side panels.
- Refine Details: Add laces, stitching, and shading for a finished look.
Understanding the Anatomy of a Shoe
Before you put pencil to paper, you must understand what you are actually drawing. A shoe isn’t just a covering; it is a structured object designed to house the human foot. Think about it: if you don’t understand the skeleton of the shoe, your drawing will always look “deflated.” To create a believable illustration, you must think like the expert shoemakers who construct these items from the ground up.
The Sole (The Foundation)
The sole is the most critical part of any shoe drawing because it dictates the shoe’s contact with the ground. It usually consists of the outsole (bottom), midsole (cushioning), and insole (inside). When drawing, treat the sole as a separate “platform” that defines the perspective of the entire sketch. If the sole is tilted incorrectly, the whole character will look like they are floating or falling over. In technical terms, the sole provides the “ground plane” for your character’s physics.
The Upper (The Body)
The “upper” refers to everything above the sole. This includes the vamp (the front part covering the toes), the quarters (the sides), and the tongue. Understanding how these pieces overlap is the secret to making a shoe look three-dimensional. The way these panels are stitched together defines the shoe’s durability and aesthetic. Modern sneakers often have complex, multi-layered uppers that require careful observation of how one material nests into another.
The Heel and Collar
The heel provides the rear structure, often reinforced by a “heel counter” to keep the foot in place. The collar is the opening where the ankle sits. Beginners often draw this opening as a flat line, but in reality, it is a circular or oval shape that wraps around the leg. Always remember that the heel should align vertically with the leg’s bone structure to maintain balance.
| Component | Function in Drawing | Pro Tip |
|---|---|---|
| Outsole | Defines ground contact | Keep the line weight heavier here to show weight. |
| Toe Box | Provides volume at the front | Should be rounded or squared, never flat. |
| Eyelets | Holds the laces | Space them evenly along the bridge of the foot. |
| Pull Tab | Practical detail at the heel | Adds a touch of realism to modern sneakers. |
Basic Step-by-Step Guide to Drawing a Shoe
Now that we understand the parts, let’s get into the actual process. You might be wondering, “Where do I even start?” The answer is always with the simplest possible shape.
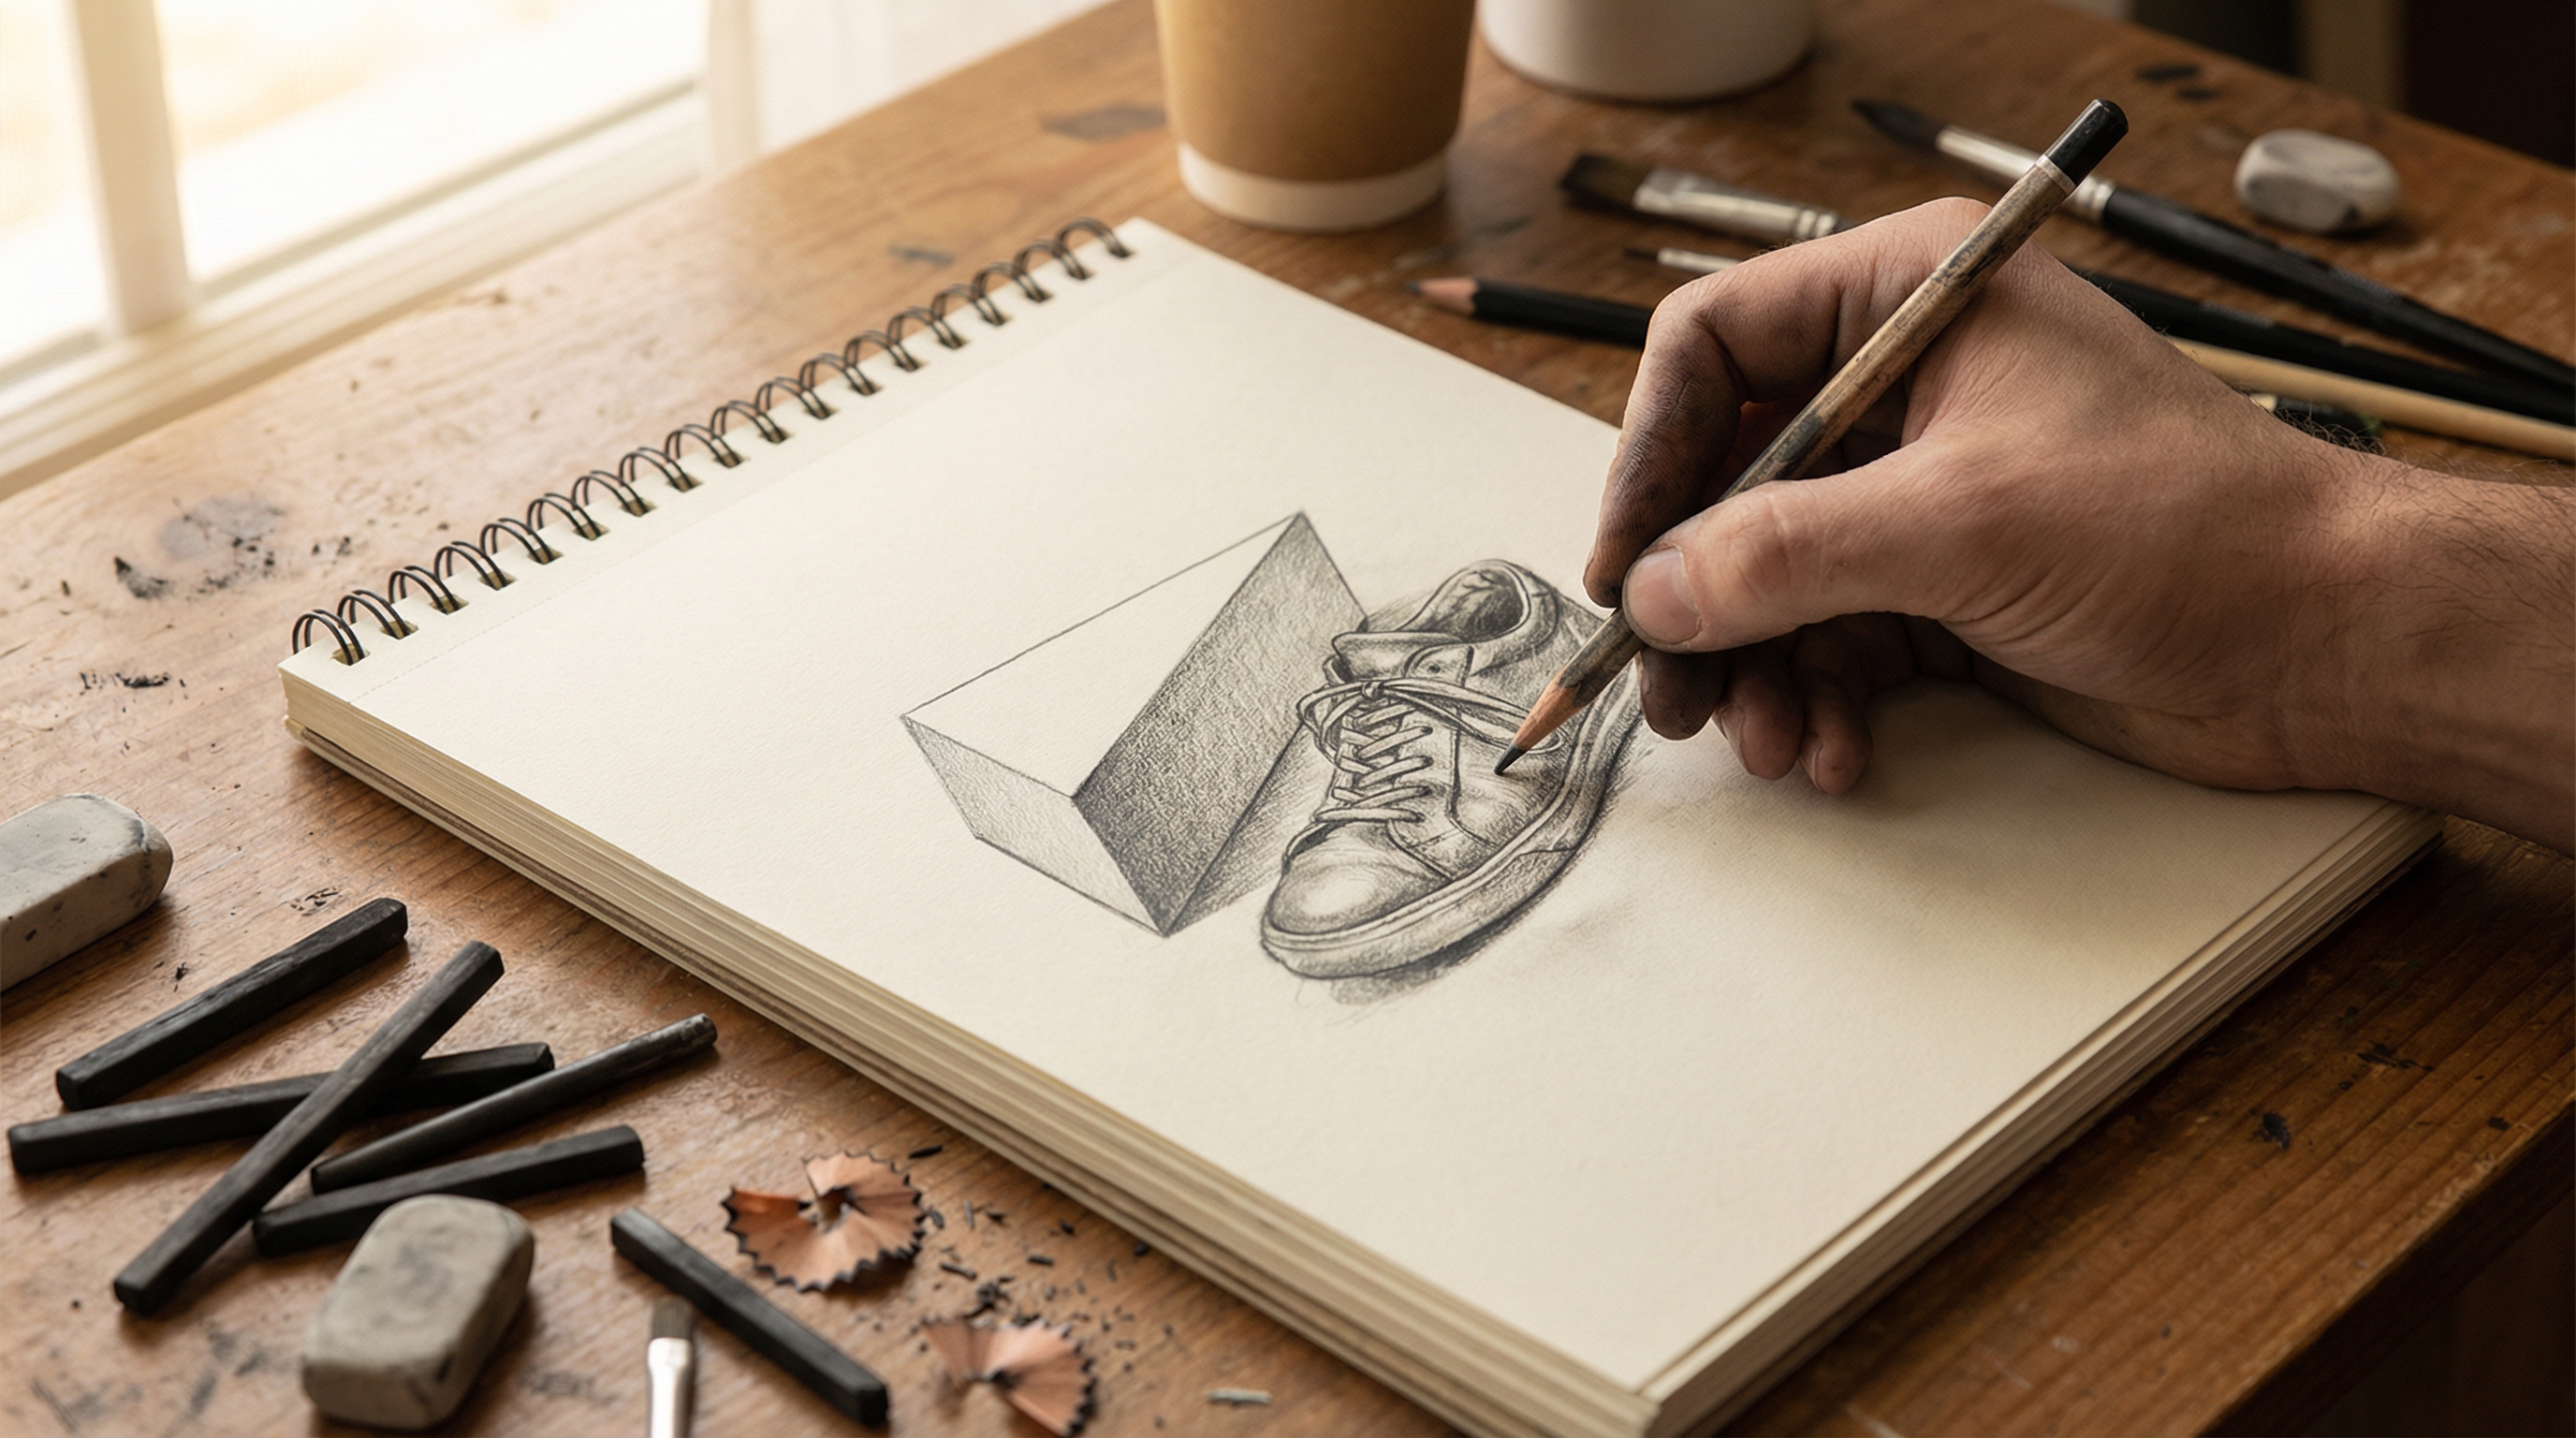
Phase 1: Establishing the 3D Wedge
Start by drawing a “wedge” shape. Think of it as a block of cheese that is wider at the back (the heel) and tapers down toward the front (the toes). Use very light pencil strokes here. This wedge represents the “last”—the mechanical form that private label shoe options use to give footwear its shape. Ensure the “bottom” of your wedge sits firmly on your horizontal ground plane. If you are drawing a 3/4 view, make sure the sides of the wedge converge toward a vanishing point.
Phase 2: Shaping the Sole and Silhouette
Once your wedge is set, draw the sole. For sneakers, the sole is usually thick and follows the curve of the wedge. For dress shoes, it might be thinner. At this stage, you should also define the “arch” of the shoe. Most shoes don’t sit perfectly flat on the ground; there is a slight lift in the middle or at the toe (known as “toe spring”). This “toe spring” is vital for depicting a foot in motion, such as during a walking cycle.
Phase 3: Creating the Opening and Tongue
Locate where the ankle would be and draw an oval for the collar. From the front of this oval, extend two lines downward toward the toes to create the “throat” of the shoe. This is where the tongue will sit. Make sure the tongue has some thickness; it shouldn’t look like a piece of paper stuck to the foot. In high-top designs, this collar will extend further up the leg, wrapping around the tibia and fibula.
Phase 4: Adding Panels and Overlays
Here is where the shoe starts to look like a specific model. Draw the toe cap (the piece covering the toes) and the heel counter. Look at your reference and see how the leather or fabric overlaps. Transition words like “next” and “subsequently” are key here because you are building layers. Add the eyelet panels where the laces will go. These panels are often “punched” through the material, so adding a small amount of depth to the holes can increase realism significantly.
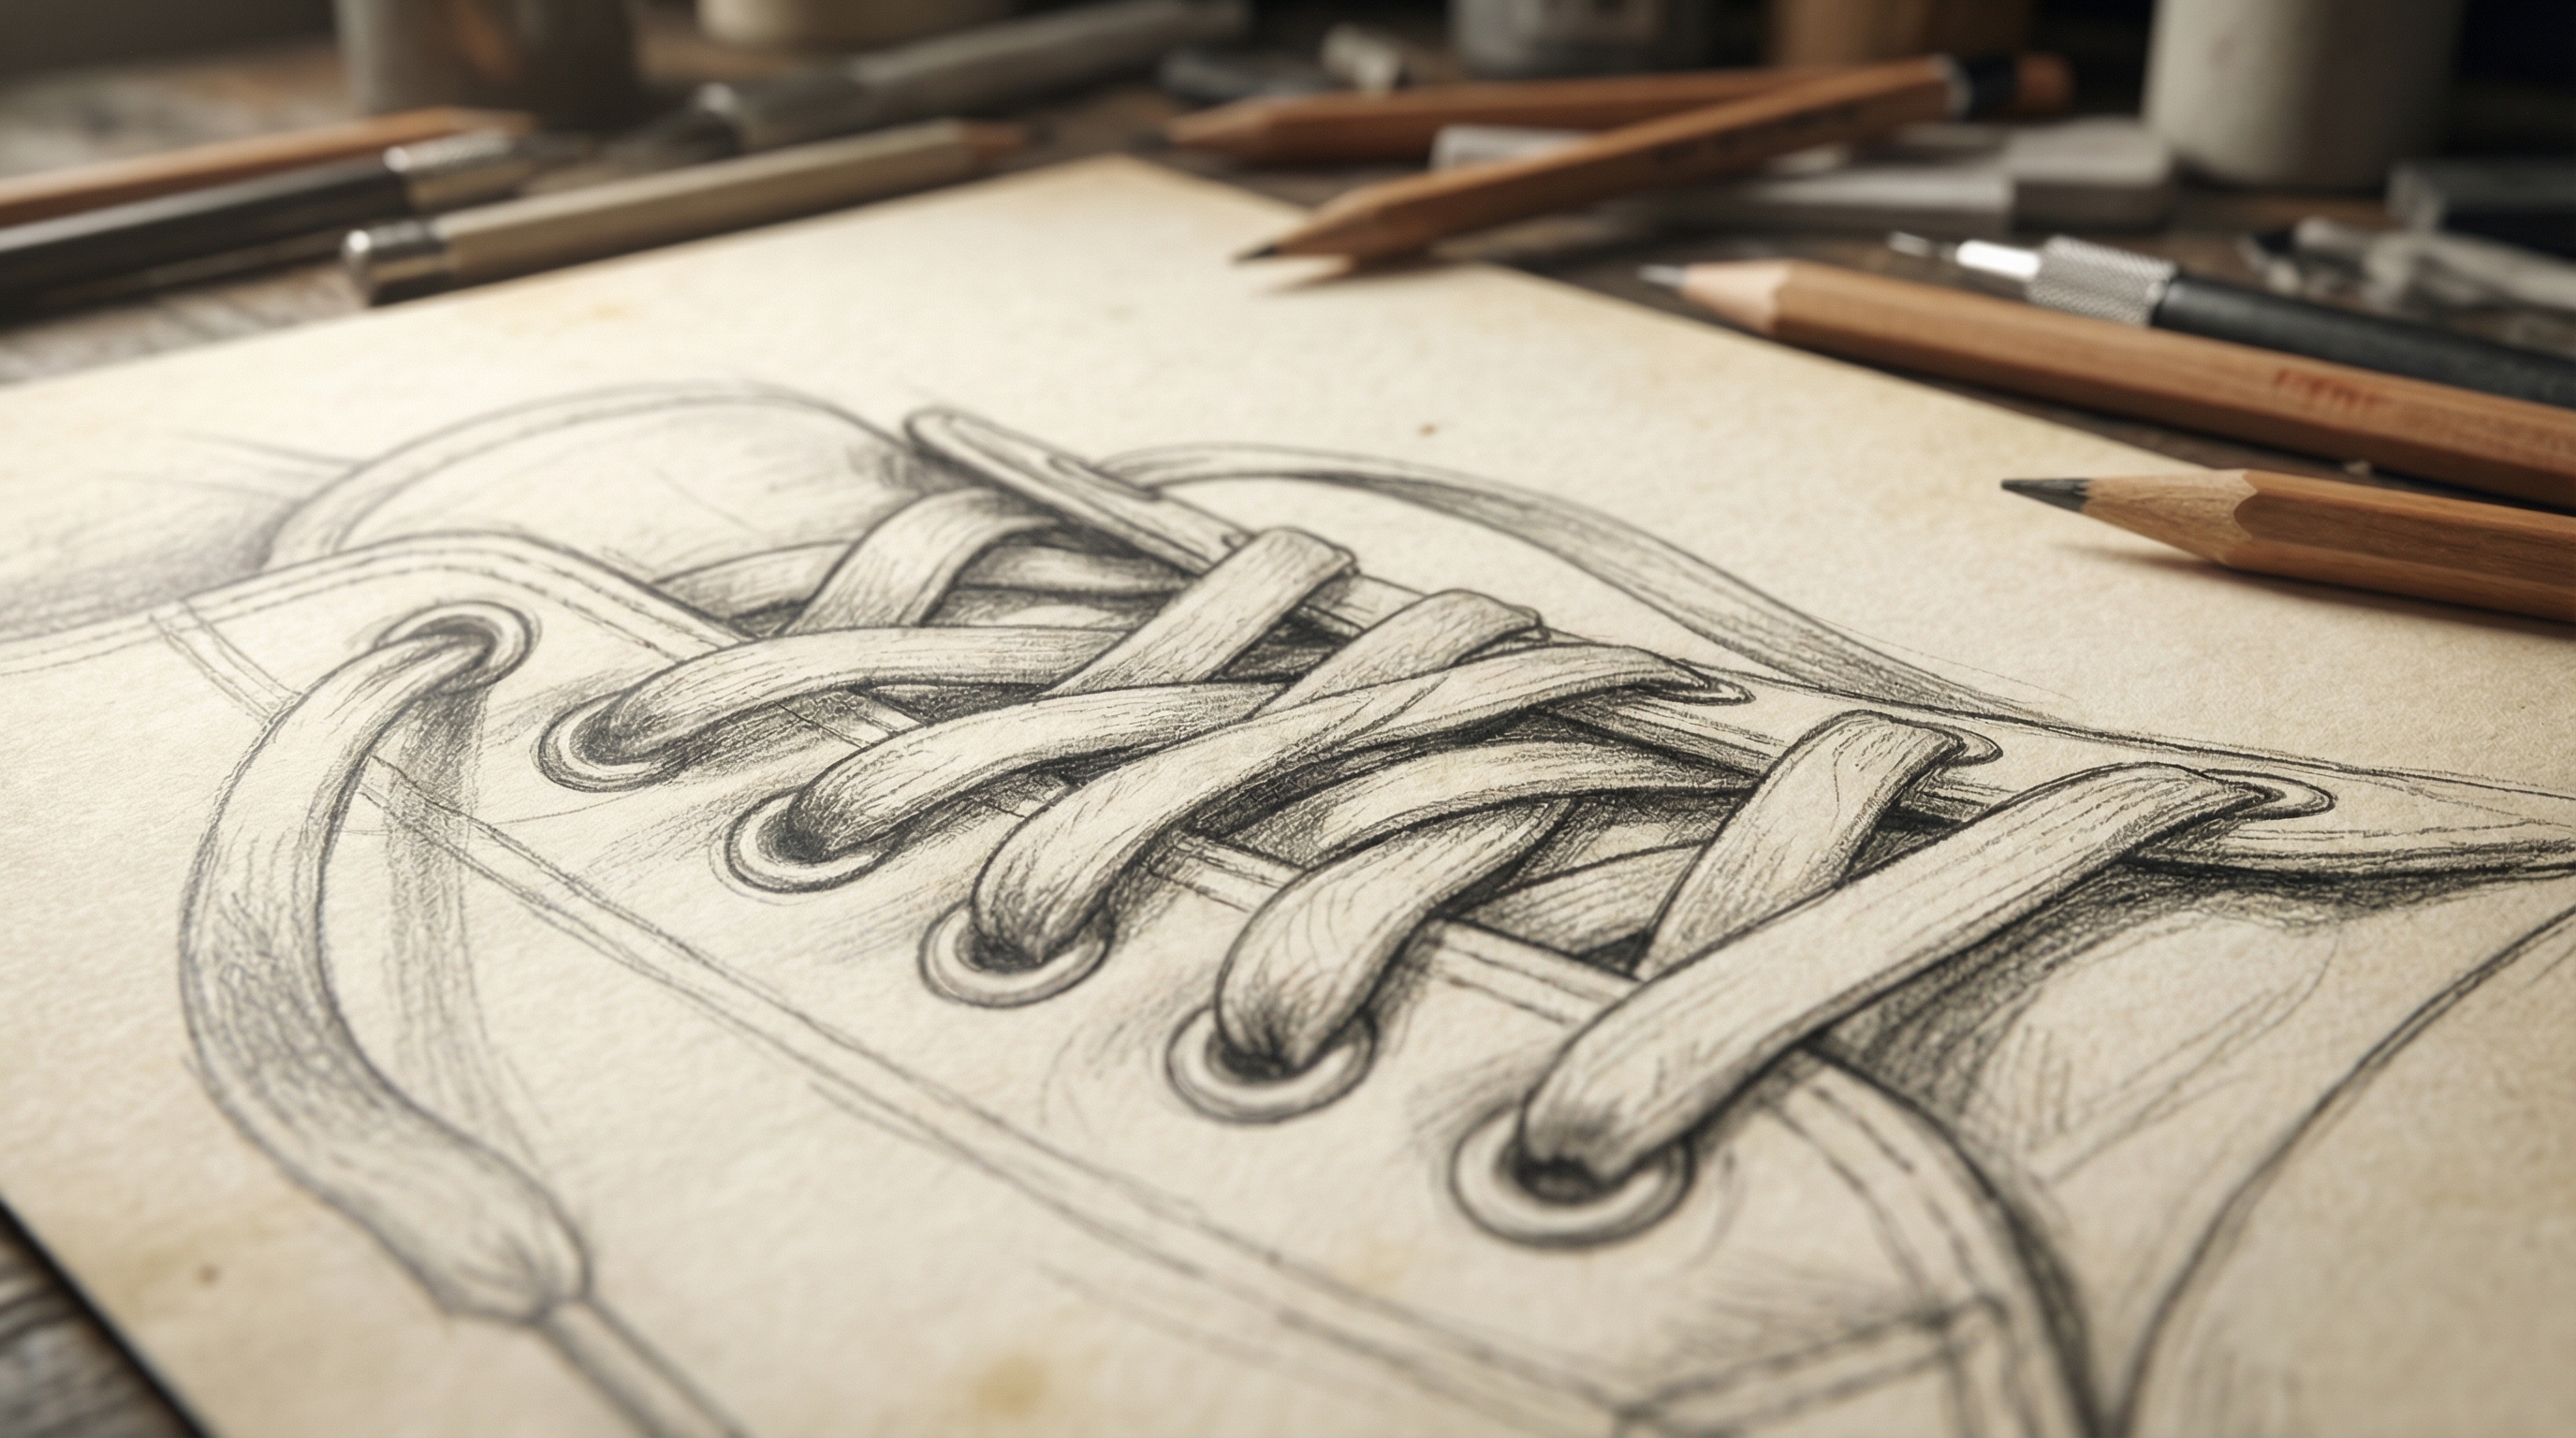
Phase 5: Laces and Final Details
Laces are often the part where artists get lazy. Don’t just draw zig-zags! Draw the laces as “U” or “S” shapes that wrap over the tongue and tuck into the eyelets. Finally, add stitching lines near the edges of the panels. This adds a level of professional detail that separates a sketch from a finished illustration. These stitches follow the contours of the panels and help define the form through “cross-contour” visual cues.
Manufacturer Pro Tip: When drawing high-quality leather shoes, remember that the “grain” of the leather affects how it creases. High-end manufacturers select specific cuts of leather for the vamp to ensure that creases look natural rather than messy.
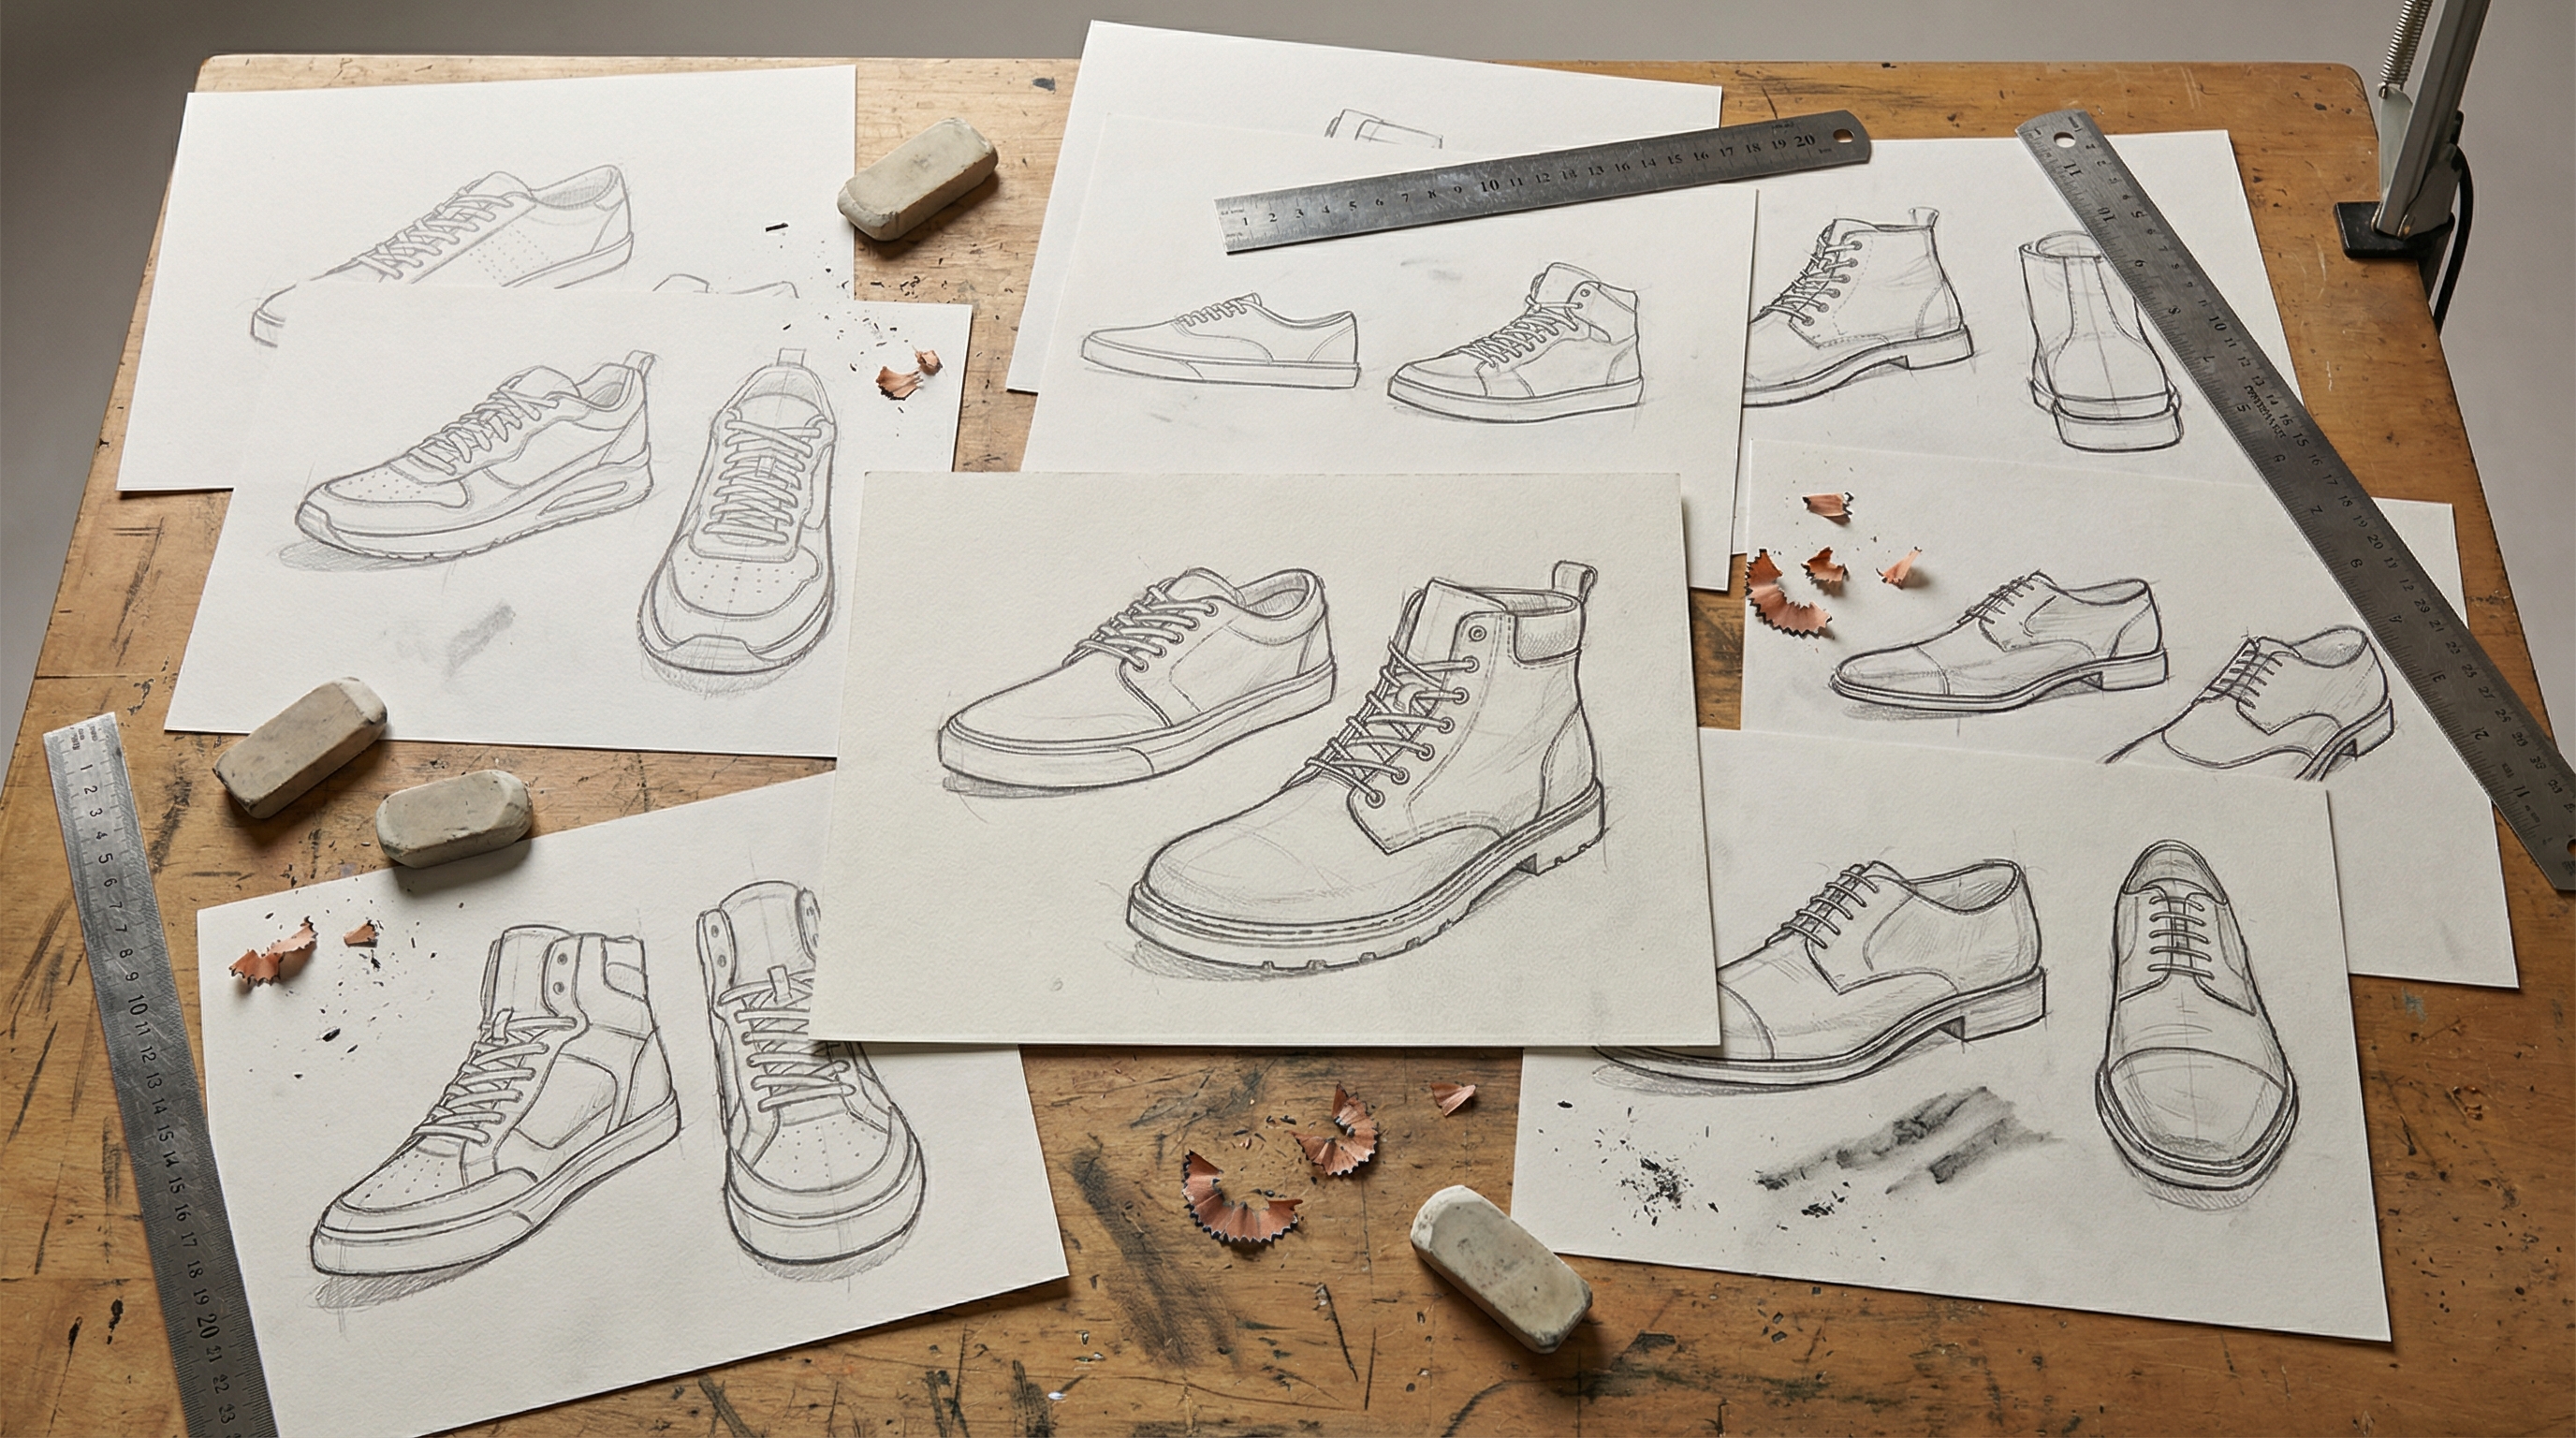
How to Draw Different Shoe Styles
Not all shoes are created equal. The way you approach a combat boot is vastly different from how you would draw a high-heeled pump. Let’s break down the three most popular categories.
Sneakers and Athletic Shoes
Sneakers are all about “chunkiness” and layering. They often feature multiple materials like mesh, suede, and rubber. When drawing sneakers, focus on the padding around the collar and the complexity of the midsole. Use bold, curvy lines to emphasize the comfort and technology built into the design. In performance footwear, the “branding” or logo often acts as a structural panel that holds the foot in place.
High Heels and Fashion Footwear
The primary challenge with heels is the extreme angle of the foot. The “wedge” we discussed earlier becomes a steep triangle. The weight of the character is concentrated on the ball of the foot and the thin point of the heel. Ensure the heel is positioned directly under the center of the heel bone for a realistic, balanced look. Without this alignment, the shoe will look physically impossible to walk in.
Boots and Heavy Footwear
Boots require a focus on “shaft” height and rugged textures. Whether it’s a Chelsea boot or a work boot, the material (usually leather or thick canvas) will fold and wrinkle at the ankle. These “compression folds” are essential for showing movement. Unlike sneakers, boots often have a “welt”—a visible ridge where the upper meets the sole—which adds to their sturdy appearance.
| Shoe Style | Key Focus Area | Common Shape |
|---|---|---|
| Sneaker | Layering & Padding | Organic, rounded curves |
| High Heel | Arch & Balance | Steep “L” or Triangle |
| Work Boot | Texture & Folds | Rectangular, sturdy block |
Mastering Perspective and Foreshortening
Perspective is the “final boss” of drawing shoes. A shoe seen from the front looks nothing like a shoe seen from the side. To master this, you need to think in three dimensions.
Here’s the deal: use the “Box Method.” Before drawing the shoe, draw a rectangular box in the perspective you want. This box acts as a container. If you can draw a box in perspective, you can draw a shoe inside it. This method ensures that the left and right shoes are consistent in size and angle.
When the shoe is coming “at” the viewer (foreshortening), the toe box will appear much larger than the heel. The details like laces and stitching will also appear “squashed” together as they move further back in space. Don’t be afraid to exaggerate these proportions to create a sense of depth. In a front-on view, the sole is often barely visible, while the tongue and the curve of the toe box dominate the composition.
Adding Texture and Realistic Material Details
What makes a drawing look “real”? It’s the texture. If everything has the same smooth finish, the shoe will look like it’s made of plastic. Every material has a unique relationship with light.
- Leather: Use sharp, high-contrast highlights. Leather reflects light in specific spots, especially on the toe and heel where the material is stretched tight over the last.
- Suede/Nubuck: Use soft, blended shading. Suede absorbs light, so the shadows should be fuzzy and the highlights very subtle.
- Canvas: Use a “cross-hatch” pattern to mimic the weave of the fabric. Canvas is also more prone to sharp, angular folds rather than the soft rolls of leather.
- Rubber: Usually has a matte finish. Focus on the “seam lines” where the rubber was molded in the factory. These small imperfections add immense realism.
If you are interested in how these materials are sourced and used in professional production, you might want to start your own shoe line to see the process firsthand.
Common Mistakes in Shoe Drawing (and how to fix them)
Even experienced artists fall into certain traps. Let’s look at how to avoid them.
- The “Flat Sole” Syndrome: Beginners often draw the sole as a perfectly straight line. In reality, soles have a “rocker” (a curve at the toe) and an arch. Fix: Always add a slight upward curve to the front 10% of the shoe to represent the toe spring.
- Ignoring the Ankle: Sometimes the shoe looks like it’s disconnected from the leg. Fix: Remember that the inner ankle bone (medial malleolus) is higher than the outer ankle bone (lateral malleolus). Your shoe’s collar should reflect this asymmetry.
- Symmetry Errors: Left and right shoes are not identical; they are mirror images. Fix: Pay attention to the “big toe side” of the shoe, which is usually straighter, while the “pinky toe side” curves inward more aggressively.
- Floating Feet: Without a ground shadow, shoes look like they are hovering. Fix: Add a small “occlusion shadow” directly where the sole touches the ground.
Manufacturer Pro Tip: In industrial shoe construction, the “last” is slightly asymmetrical to match the natural swing of the human foot. When drawing, if your shoe looks too “perfectly straight,” it will look unnatural.
Pro Tips for Achieving a Professional Look
Wait, there’s more! To truly elevate your art, consider these advanced techniques:
- Vary Your Line Weight: Use thicker lines for the bottom of the sole and thinner lines for the stitching and highlights. This creates an immediate sense of weight and “grounding.”
- Use Reference Photos: Even the pros do it. Look at photos of real shoes from multiple angles to understand how the light hits the different panels.
- Think About Function: Ask yourself, “How does this shoe stay on?” Adding things like zippers, velcro, or functional laces makes the design more believable.
- Deconstruct the Laces: Think of laces as ribbons with volume, not just lines. They should cast tiny shadows on the tongue of the shoe.
Frequently Asked Questions (FAQs)
How do I make shoes look like they are being worn?
To make shoes look “occupied,” add “stress folds” where the foot bends (usually at the ball of the foot). The “upper” should also bulge slightly where the widest part of the foot sits, particularly on the medial side.
What is the easiest shoe for a beginner to draw?
Slip-on canvas shoes (like Vans) are the best starting point. They have very few panels, no laces, and a simple, consistent sole shape that is easy to map onto a basic wedge.
How do I draw laces without them looking messy?
Draw the “path” of the lace first as a single light line. Then, go back and add the thickness. Remember that laces go over and under the eyelet panels. Consistent spacing between the eyelets is the key to a clean look.
How do I draw shoes from the front?
In a front view, the shoe looks like a rounded triangle or a “tombstone” shape. The most important part is the toe cap and the tongue, which will be the most visible elements. The heel will be almost entirely hidden behind the body of the shoe.
Should I draw the foot before the shoe?
Yes! Especially as a beginner, sketching a simplified version of the foot (the “sock” shape) first ensures that the shoe’s proportions and “fit” are correct.
Drawing shoes is a journey of observation. Once you start noticing the way the sole meets the ground and how the panels overlap, you’ll find that footwear isn’t a “chore”—it’s an opportunity to add personality and style to your characters. Whether you’re sketching for fun or dreaming of working with expert shoemakers, these fundamentals will serve as your foundation.
Keep practicing, use plenty of references, and don’t be afraid to make mistakes. Every “bad” shoe drawing brings you one step closer to a perfect one. For more insights into the world of professional footwear design and manufacturing, explore our resources on custom shoe construction and material selection.
To take your footwear concepts from paper to reality, contact the experts at TL Stage today.