
Have you ever considered the invisible biological and structural risks lurking within a pair of high-end, pre-owned leather boots or limited-edition sneakers? While the secondhand market offers an accessible entry point into luxury fashion and high-performance gear, it simultaneously presents a complex challenge regarding hygiene and material stability. Most enthusiasts focus on the aesthetic “curb appeal” of a thrifted find, yet they remain blissfully unaware of the microscopic pathogens and deteriorating chemical bonds that define a used shoe’s true condition.
The problem is that footwear, by design, acts as a dark, humid incubator for specialized fungal colonies and bacterial biofilms that standard household cleaners cannot penetrate. A cursory wipe with a damp cloth may remove surface dust, but it does nothing to address the deep-seated presence of Tinea pedis or the progressive degradation of the internal foam architecture. Furthermore, the previous owner’s unique gait has likely imparted a “mechanical memory” onto the materials, potentially leading to orthopedic discomfort or structural failure if the shoe is not properly reset.
Failure to treat these issues scientifically can result in more than just a foul odor; it can lead to chronic skin infections or the catastrophic crumbling of the midsole during wear. You risk wasting your investment and compromising your health by applying generic cleaning methods to specialized technical materials. Fortunately, by adopting a manufacturer-grade restoration protocol, you can systematically neutralize biological threats and revitalize the shoe’s structural integrity. This guide provides the technical framework necessary to transform a hazardous used item into a professional-grade asset, utilizing the same principles found in private label shoe manufacturing.
Professional Summary of Restoration Methodologies
| Restoration Method | Primary Objective | Key Tools/Agents | Optimal Material |
|---|---|---|---|
| UV-C Irradiation | DNA-level sterilization | 254nm UV Lamps | All (Interiors) |
| Aqueous Surfactants | Soil emulsification | pH-neutral soaps | Mesh, Synthetic |
| Lipid Replenishment | Fiber elasticity | Neatsfoot/Mink Oil | Full-Grain Leather |
| Thermal Reset | Structural re-lasting | Controlled Dry Steam | Suede, Nubuck |
| Hydrolysis Testing | Structural audit | Compression gauges | PU/EVA Midsoles |
The Bio-Chemical Mandate: Why Deep Physical Cleaning and Sterilization Are Mandatory
The primary motivation for a rigorous restoration regimen is the mitigation of significant dermatological risks, specifically Tinea pedis, commonly known as athlete’s foot. This infection is caused by dermatophytes, a group of fungi that thrive on the keratin found in human skin and nails, which accumulate within the porous linings of footwear. Because these organisms can remain dormant in a dehydrated state for months, a “clean-looking” secondhand shoe can still harbor infectious spores waiting for the warmth and moisture of a new foot to reactivate.
Beyond the fungal risks, the internal environment of a used shoe is often colonized by Brevibacterium, which consumes dead skin cells and produces methanethiol, the primary source of the “cheesy” foot odor. These bacteria embed themselves within the open-cell structure of EVA (Ethylene Vinyl Acetate) and PU (Polyurethane) foams used in insoles. A superficial cleaning fails to disrupt these established biofilms, meaning the odor will inevitably return as soon as the shoe reaches body temperature.
Furthermore, the pH level of the shoe’s interior is often heavily altered by the previous owner’s sweat, which is naturally acidic but can become alkaline as bacteria break down urea. This shift in the micro-environment can accelerate the breakdown of the leather’s tanning salts or the degradation of synthetic linings. By performing a deep chemical disinfection, you are not merely cleaning; you are resetting the material’s chemical equilibrium to a neutral state, ensuring the long-term preservation of the tlstage.com quality standards.
Table 1: Biological Contaminants and Neutralization Requirements
| Pathogen Class | Examples | Risk Level | Neutralization Method |
|---|---|---|---|
| Dermatophytes | Trichophyton rubrum | High (Infectious) | Antifungal agents (Clotrimazole/Tolnaftate) |
| Gram-Positive Bacteria | Staphylococcus aureus | Medium (Skin Irritation) | Quaternary ammonium compounds |
| Odor-Producing Bacteria | Brevibacterium | Low (Social/Aesthetic) | Activated charcoal & pH balancers |
| Mold/Mildew | Aspergillus | Medium (Material Decay) | UV-C Radiation & Humidity Control |
Evaluating Structural Lifespan: The Chemistry of Hydrolysis and Delamination
Before initiating any moisture-based cleaning, a technician must evaluate the structural “half-life” of the shoe’s adhesive and foam components. This is especially critical for vintage sneakers or boots that have been in storage for over five years. The most common cause of failure in high-end footwear is hydrolysis, a chemical reaction where water molecules in the atmosphere break the ester bonds in the polyurethane (PU) polymer chains.
Hydrolysis is a progressive and irreversible process that turns a solid, supportive midsole into a brittle or “cake-like” substance that crumbles under load. To test for this, apply firm pressure to the midsole with a blunt tool; if the material does not immediately rebound or if it shows micro-cracking, the shoe is in a state of terminal degradation. In this scenario, any liquid cleaner will act as a catalyst, accelerating the collapse of the foam structure and rendering the restoration effort futile.
Another critical checkpoint is the bond between the outsole and the upper, which is typically maintained by high-strength PU cement. Over time, environmental exposure causes “delamination,” where the adhesive loses its tacky properties and separates from the substrate. This is often visible at high-flex points, such as the ball of the foot. Understanding these mechanical limitations allows the restorer to decide whether a standard clean is sufficient or if a full “sole-swap” or reglue is required to meet the safety standards expected by our team.
Manufacturer Pro Tip: Managing Delamination and PU Cement Failure
When you encounter early-stage Delamination, do not simply apply more glue over the old residue. The original PU cement has undergone a chemical change and will prevent new adhesives from bonding. You must mechanically strip the old cement using a solvent like acetone (sparingly) and high-grit sandpaper to create a fresh bonding surface. This restores the structural integrity of the unit rather than just providing a temporary “patch” fix.
Phase One: Molecular Sterilization and Odor Neutralization
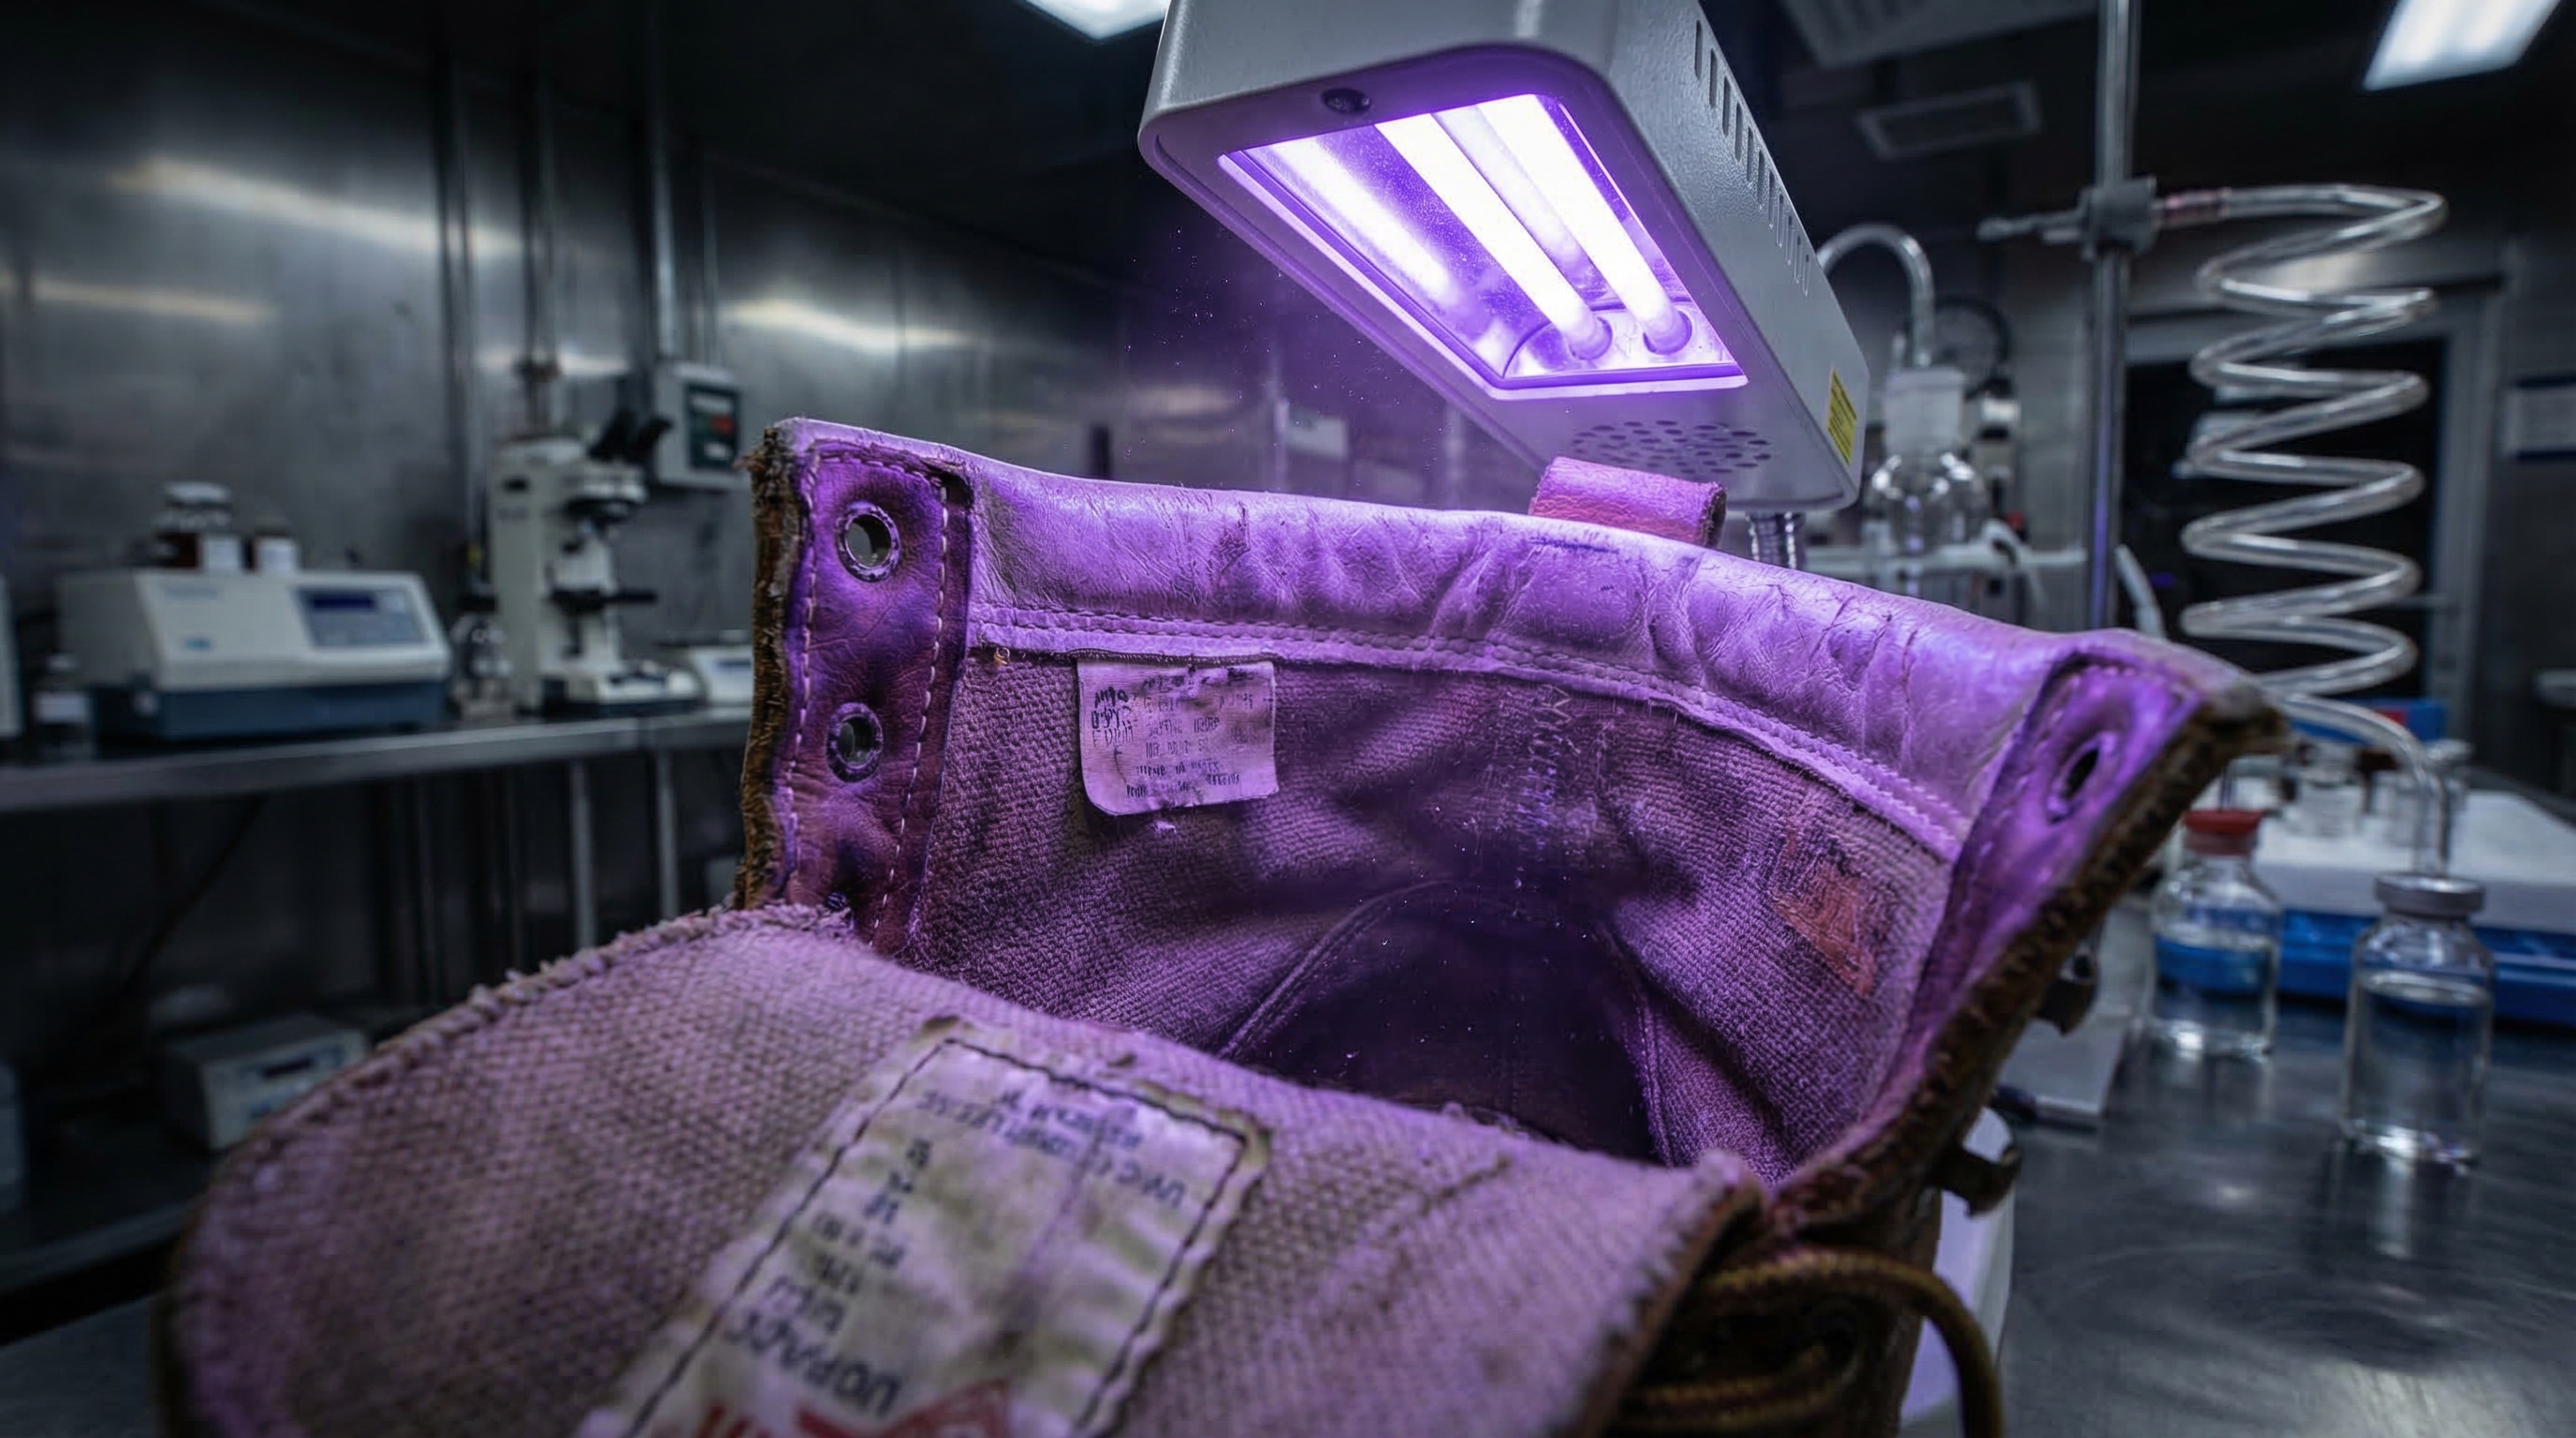
The restoration process begins with a comprehensive strike against the microbial population residing in the shoe’s interior. You must first remove the laces and insoles to expose the “lasting board”—the structural base of the shoe’s upper. This area is often a focal point for moisture accumulation and bacterial growth. Utilizing a disinfectant with a high concentration of quaternary ammonium compounds is effective because these molecules carry a positive charge that disrupts the negatively charged cell membranes of bacteria.
For an even more rigorous approach, professionals employ UV-C sterilization lamps operating at a wavelength of 254 nanometers. This specific frequency of light penetrates the cell walls of microorganisms and permanently damages their DNA, preventing them from reproducing. It is a dry, chemical-free method that is particularly useful for delicate vintage linings that might react poorly to liquid sprays.
If the shoes exhibit persistent odors, the use of an ozone generator is the most advanced solution. Ozone ($O_3$) is a powerful oxidizing agent that reacts with volatile organic compounds (VOCs) at a molecular level, effectively “burning” the odor out of the fibers. However, caution must be exercised, as excessive ozone exposure can accelerate the aging of rubber components. After sterilization, it is wise to contact experts if you are unsure about the material’s tolerance to high-energy treatments.
Core Cleaning Techniques: Surfactants and PH Management for Technical Materials
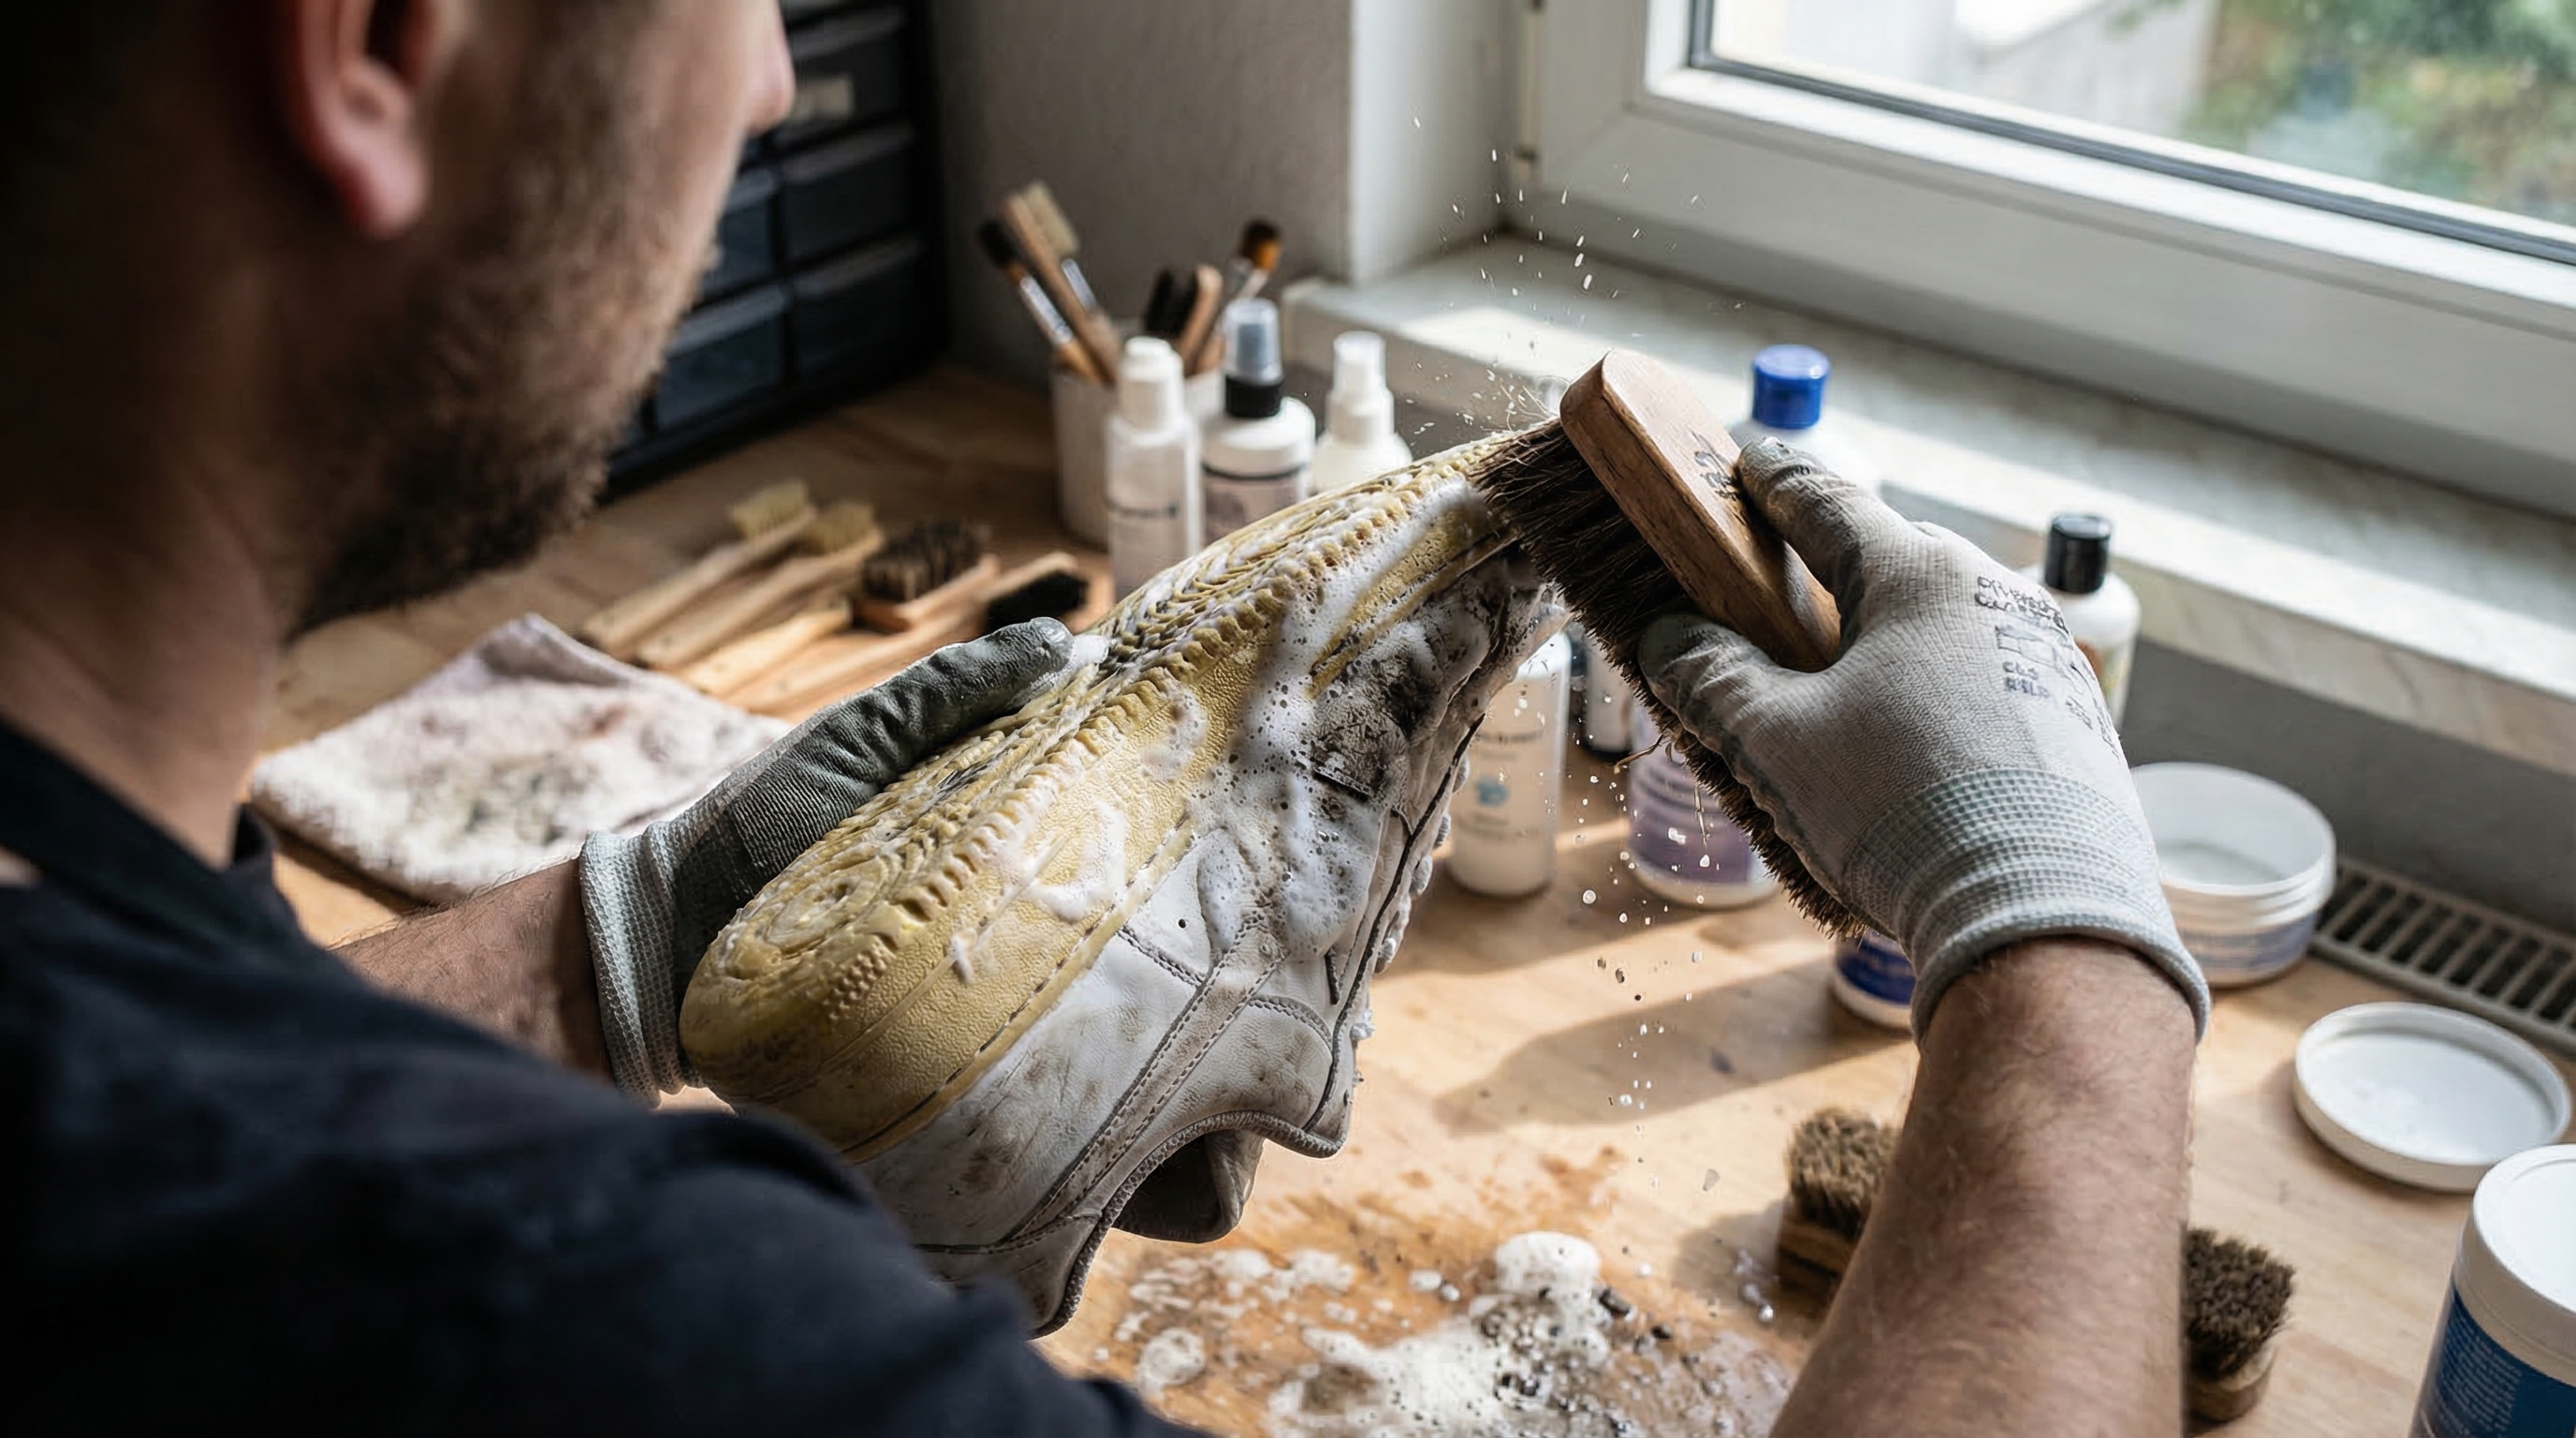
Cleaning is not merely the application of soap; it is a controlled chemical reaction designed to lift dirt while preserving the substrate. For smooth leather, the goal is to use a surfactant that creates “micelles”—spherical structures that trap oil and dirt, allowing them to be rinsed away. It is imperative to use a cleaner with a pH between 4.5 and 5.5, matching the natural acidity of leather. Alkaline cleaners (like many household soaps) will strip the tanning salts and fats, leading to permanent fiber stiffness.
Suede and nubuck require a “low-moisture” approach because water can cause the protein fibers (the nap) to flatten and lose their texture. Instead of liquid detergent, a “dry” foaming agent is used, which suspends dirt in bubbles that can be blotted away before they soak into the skin. A specialized brass or nylon brush is then used to “tease” the nap back into its upright position, ensuring the light reflects correctly across the surface of the material.
Technical mesh and synthetic weaves, often found in high-performance sneakers, are highly porous and tend to trap fine particulates deep within their structure. A medium-stiff brush should be used in conjunction with a foaming cleaner to agitate the dirt out of the weave. Because these materials are often backed by open-cell foam, it is crucial to use a “blotting” motion with a microfiber towel to pull the dirty water out of the shoe rather than pushing it deeper into the padding.
Table 2: Material Cleaning Methodology and Specification Comparison
| Material Category | Cleaning Medium | Method of Agitation | Primary Chemistry | Technical Risk Mitigation |
|---|---|---|---|---|
| Full-Grain Leather | Aqueous Emulsion | Circular Horsehair | Non-ionic Surfactants | Lipid replenishment post-clean |
| Suede / Nubuck | Solvent / Dry Foam | Linear Brass/Crepe | Volatile Hydrocarbons | Fibril alignment preservation |
| Technical Mesh | High-Foam Aqueous | Oscillating Synthetic | Anionic Surfactants | Foam saturation prevention |
| Synthetic Microfiber | Aqueous Solution | Cross-hatch Nylon | pH Neutral Detergents | Delamination of bonded layers |
Detail Work: Restoring the Laces, Insoles, and Midsole Aesthetics
The secondary components of a shoe—the laces and insoles—often require the most aggressive cleaning. Laces are typically made of woven polyester or cotton and can withstand a soak in an oxygen-based bleach solution (sodium percarbonate). This chemical reaction releases oxygen bubbles that physically lift dirt and stains from the weave without the damaging effects of chlorine bleach. After soaking, the laces should be air-dried to prevent the “shrinkage” that often occurs in mechanical dryers.
Insoles, particularly those made of OrthoLite or memory foam, must be handled with care to avoid “delamination” of the top fabric layer. A gentle scrub with a disinfectant followed by a thorough air-drying is usually sufficient. If the insole has lost its “compression set”—meaning it no longer rebounds to its original thickness—it has reached the end of its functional life. In this case, replacing them is the only way to restore the original comfort levels intended by the shoe’s designers.
Midsoles, especially white rubber or foam ones, often suffer from “yellowing” due to oxidation. This is a photochemical reaction where UV light causes the polymer to lose electrons, resulting in a change in visible color. This can be reversed using a high-concentration hydrogen peroxide cream (12%) and reapplying UV light. This process, often called “retro-brighting,” forces a reduction reaction that restores the original white appearance of the material.
Manufacturer Pro Tip: Utilizing “Lasting Tension” to Restore Silhouette
Secondhand shoes often carry the “memory” of the previous owner’s foot shape, resulting in a collapsed toe box or warped quarters. When the shoes are approximately 20% damp, you must insert a cedar wood shoe shaper to apply Lasting Tension. By tensioning the materials while the fibers are still soft from cleaning, you effectively re-mold the shoe back to its original factory silhouette. This is a secret weapon for increasing the perceived value and comfort of thrifted footwear.
Advanced Substrate Restoration: Suede Fibril Realignment
Suede restoration is often misunderstood as a simple brushing task. In reality, high-quality suede is defined by its GSM (Grams per Square Meter), which dictates the density of the protein fibers. When suede becomes “matted” or “slick,” it is because the individual fibrils have become locked together by environmental contaminants or excessive moisture. To restore the original factory hand-feel, a technician must perform a controlled steam-injection process.
By using dry steam (approx. 5% moisture content), you can break the hydrogen bonds holding the matted fibrils together without saturating the skin. Once the fibrils are loosened, a “cross-hatch” brushing technique is employed to achieve perfect Fibril alignment. This ensures the “tracking” (the color change when you move your hand across the surface) is uniform. Furthermore, during this process, it is vital to inspect the SPI (Stitches Per Inch) along the seams.
If the steam causes the thread to contract or the leather to expand, the SPI may fluctuate, leading to structural tension that can cause the seam to “grin” or fail. Professional-grade restoration maintains consistent tension to keep the SPI within the manufacturer’s original 8-12 range for luxury footwear.
Manufacturer Pro Tip: Suede Nap Restoration and pH Balance
When working with premium 400+ GSM suede, always brush against the natural grain while the material is under 55°C dry steam. This maximizes Fibril alignment and prevents “burnishing” of the skin. Post-steaming, verify the seam integrity by measuring the SPI; a sudden decrease in SPI suggests material expansion that requires immediate re-lasting to prevent permanent structural warping and maintain proper pH Balance.
The Art of Drying: Preventing Adhesive Liquification and Material Warping
The drying phase is perhaps the most critical stage of the restoration process. Many amateurs make the mistake of using high heat—such as a hairdryer or radiator—to speed up the process. This is a catastrophic error. High heat can reach the “glass transition temperature” of the adhesives used in the shoe’s construction, causing them to liquify and lose their bond. This results in the “sole separation” that ruins many high-quality boots and sneakers.
The scientifically correct method is controlled evaporation. By placing the shoes in a room with a steady airflow and a dehumidifier, you allow moisture to escape the fibers at a natural rate. This prevents the “brittleness” associated with rapid drying. Furthermore, maintaining the internal structure with shoe trees during this phase is vital to prevent the leather from shrinking or the toe box from collapsing as it dries.
To maximize efficiency, the shoe should be positioned with the opening facing the airflow. If the shoe is particularly saturated, stuffing it with unprinted packing paper can help draw moisture out through capillary action. The paper must be changed every few hours to ensure that a damp environment does not persist, which could invite the growth of new mold or mildew during the very process intended to remove it.
Table 3: Technical Parameters for Drying and Curing
| Process Phase | Target Temperature | Relative Humidity (RH) | Duration | Critical Metric |
|---|---|---|---|---|
| Initial Evaporation | 21°C – 24°C | 40% – 45% | 6 – 8 Hours | Surface moisture removal |
| Core Dehydration | 22°C – 26°C | 30% – 35% | 12 – 24 Hours | Internal fiber stabilization |
| Adhesive Curing | 18°C – 22°C | 50% | 12 Hours | Bond strength solidification |
| Conditioner Absorption | 23°C – 25°C | 45% | 4 Hours | Lipid penetration depth |
Final Care: Re-Establishing Surface Tension and Protection
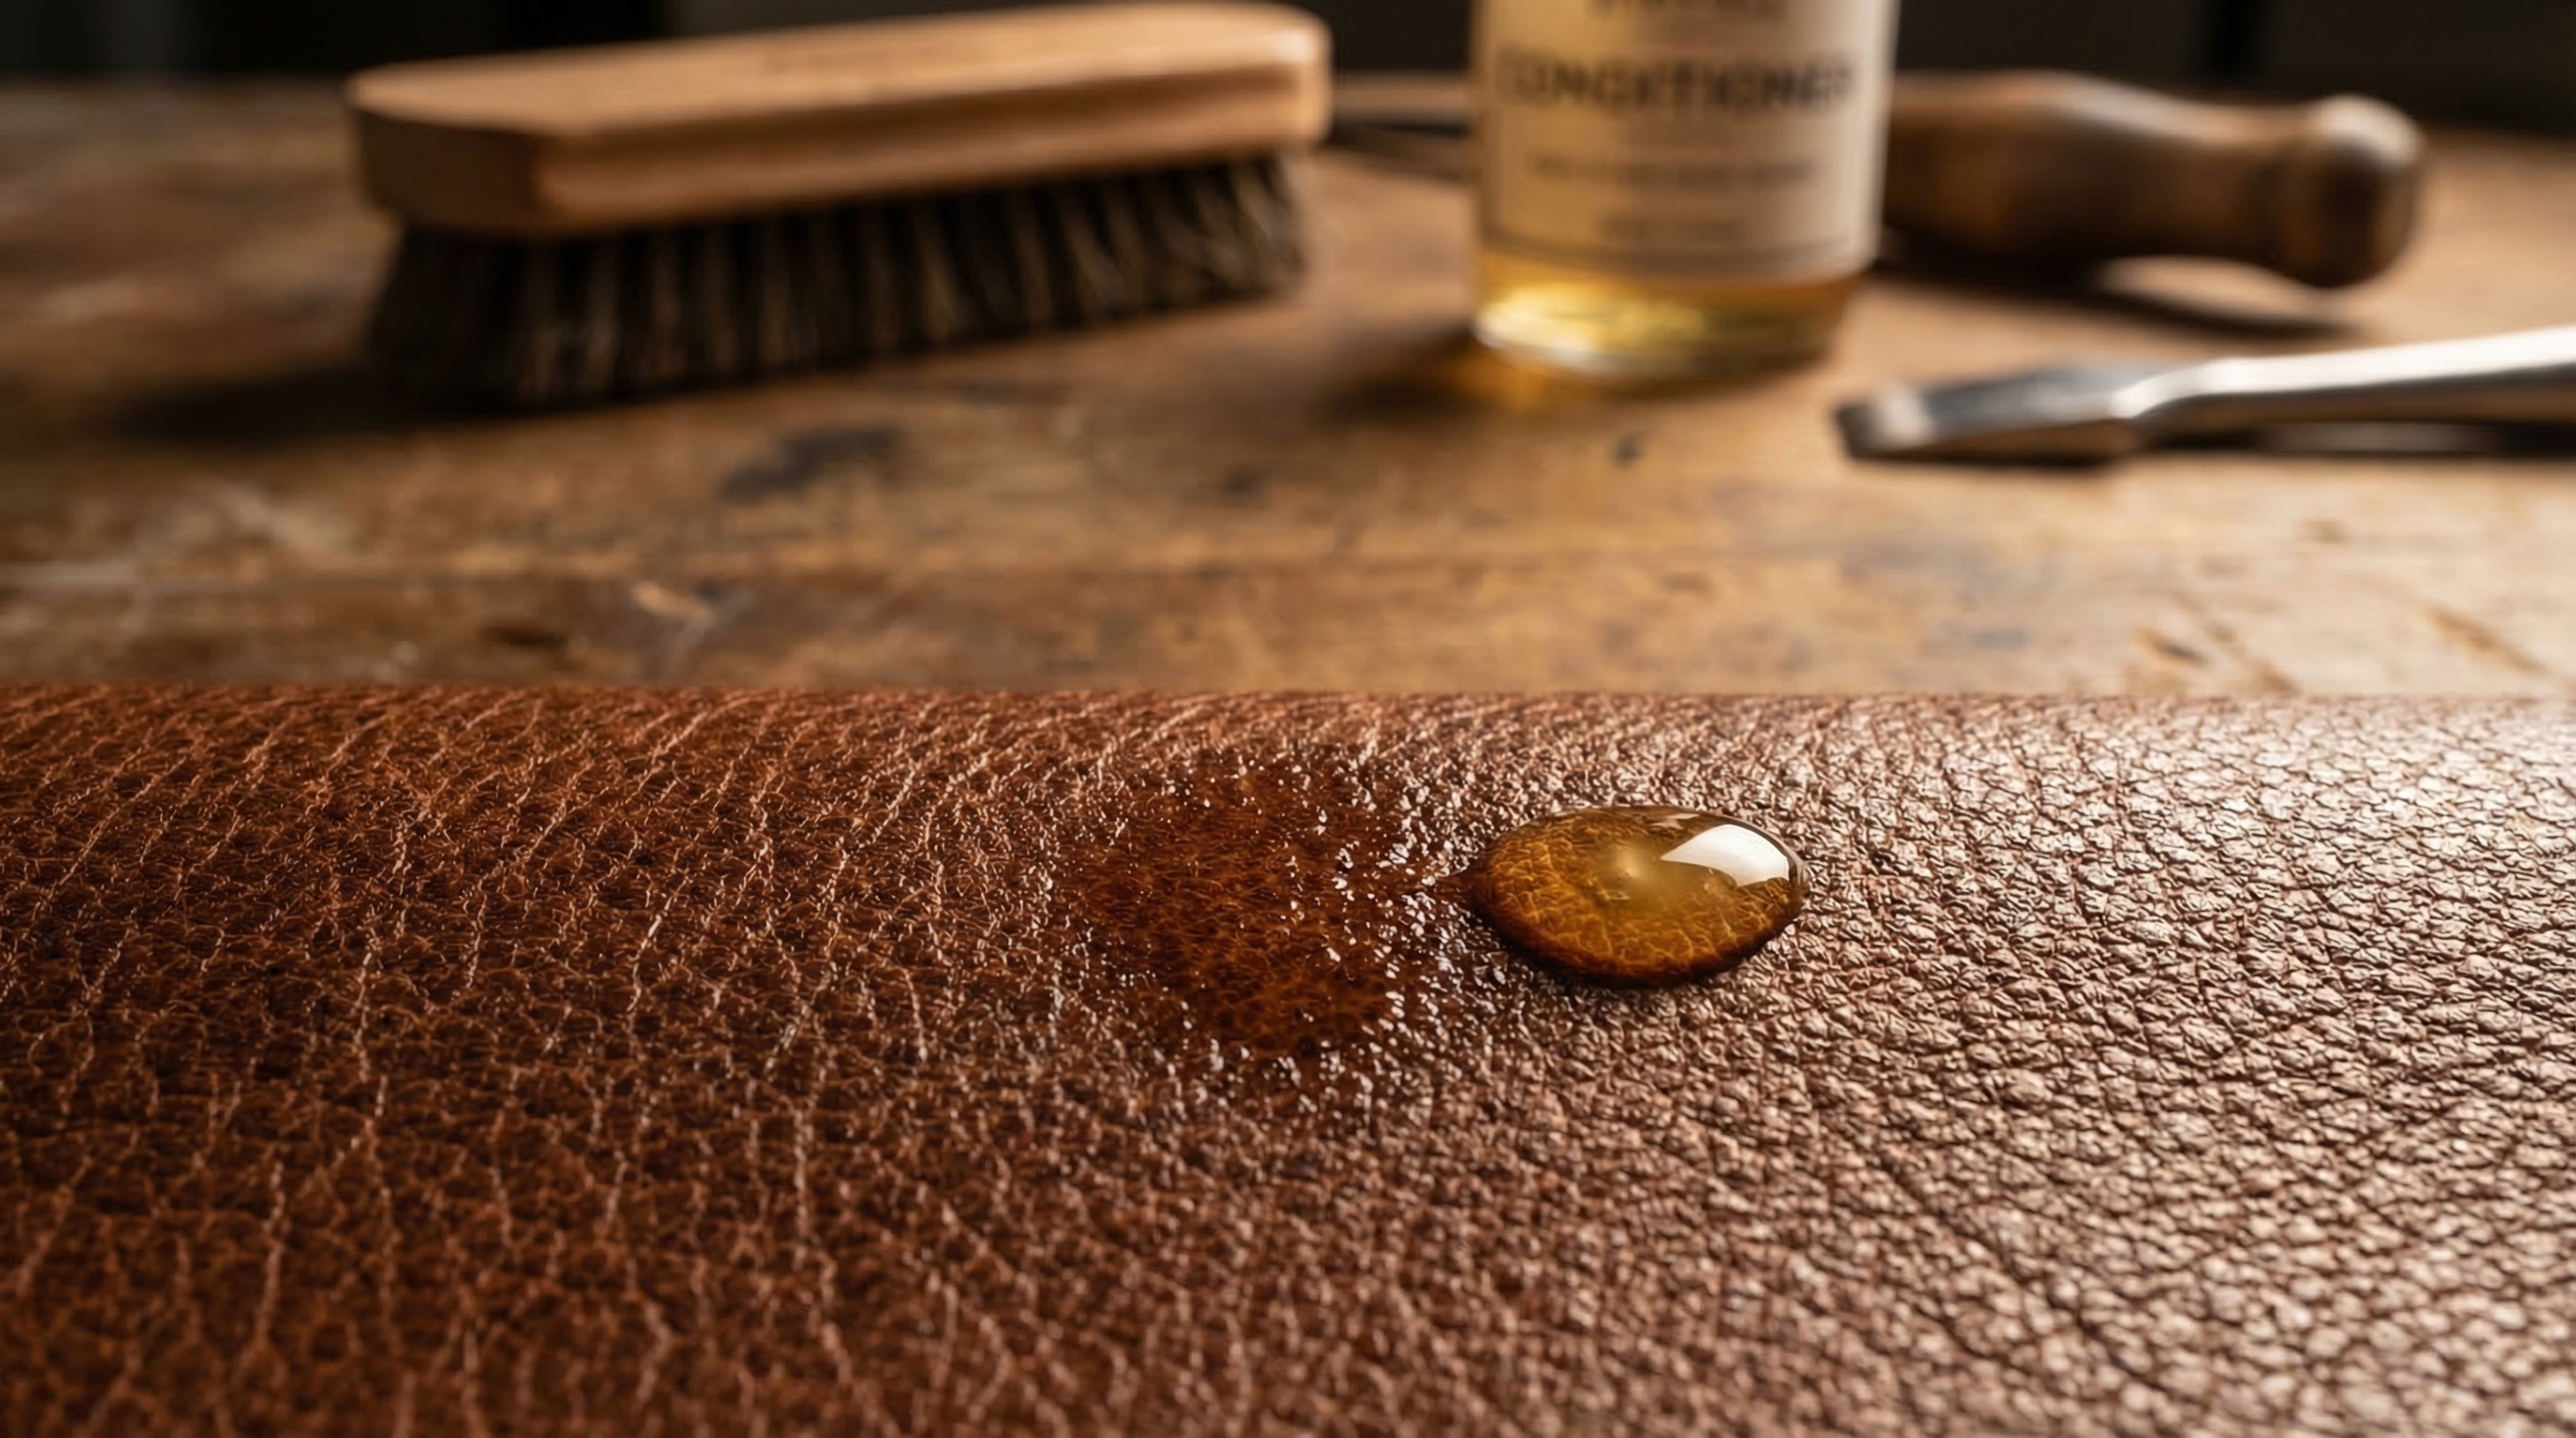
Once the shoe is dry and the structure is reset, the final step is to restore the protective barriers that were removed during the deep clean. For leather, this means applying a conditioner rich in lipids (fats and oils) to replenish the “internal lubrication” of the collagen fibers. This prevents the leather from cracking under the stress of movement. A high-quality cream will penetrate the pores and re-establish the material’s “surface tension,” making it naturally more resistant to water and dust.
For suede and fabric shoes, a nano-technology waterproof spray is essential. These products contain fluoropolymers that create a microscopic “forest” of pillars on the surface of the material. These pillars are so small and close together that water droplets cannot penetrate between them, causing the water to bead up and roll off. This hydrophobic layer is your first line of defense against future stains and biological contamination.
Finally, inspect the sole units for any minor gaps. If small areas of delamination are found, a tiny application of high-quality PU cement should be used to seal the edge. This “re-manufacturing” step ensures that the shoe is not only clean but structurally sound for its next lifecycle. Whether you are maintaining a personal collection or exploring private label shoe opportunities, these finishing touches are what define professional-level restoration.
Strategic Considerations for the Footwear Professional
Restoring footwear is a sophisticated intersection of chemistry, physics, and craftsmanship. By understanding the molecular behavior of polymers like polyurethane and the biological lifecycle of dermatophytes, you elevate a simple chore into a technical discipline. This approach not only extends the life of the product but also ensures a hygienic and safe experience for the wearer.
As the industry shifts toward sustainability, the ability to restore and maintain existing footwear becomes a critical skill. Whether you are a dedicated collector, a reseller, or someone interested in the broader world of shoe manufacturing, adopting these manufacturer-grade protocols will set your work apart. Always remember that the goal of restoration is to return the shoe to its “factory baseline” in both appearance and structural performance.
Frequently Asked Questions
Can you actually kill the fungus in used shoes?
Yes, but it requires more than just soap. You must use a disinfectant specifically labeled as antifungal (containing ingredients like benzalkonium chloride) or use a UV-C sterilization device. These methods disrupt the DNA and cellular structure of fungi like Trichophyton rubrum, making the shoes safe to wear.
How do I know if the soles of my shoes are about to fall off?
Check for signs of hydrolysis, which is the chemical breakdown of the polyurethane midsole. If the foam feels sticky, shows micro-cracks, or yields easily to thumb pressure without rebounding, the structural bonds have failed. In this state, the sole is likely to crumble or delaminate during your next walk.
Why did my leather shoes get stiff after I cleaned them?
This usually happens because an alkaline cleaner (high pH) was used, which stripped the natural oils and tanning salts from the leather. To fix this, you must apply a pH-balanced leather conditioner to replenish the lipids and restore the fiber elasticity.
Is it safe to put sneakers in the washing machine?
While many people do it, the machine’s mechanical agitation and excessive water can lead to delamination and “surface tension” loss. If you must use a machine, place the shoes in a mesh bag, use cold water, and never use the spin cycle or a heated dryer, as heat will liquefy the PU cement holding the shoe together.
What is the best way to stop used shoes from smelling?
Odor is caused by bacterial biofilms. The most effective treatment is a combination of deep-cleaning the insoles, using an antimicrobial spray, and ensuring the shoes are completely dried in a low-humidity environment. For extreme cases, an ozone treatment can neutralize odors at a molecular level.
Can “yellowed” midsoles be turned white again?
Yes, through a process called “de-yellowing” or “retro-brighting.” By applying a high-concentration hydrogen peroxide cream and exposing the midsole to UV light, a chemical reduction reaction occurs that reverses the oxidation that caused the yellowing in the first place.
Looking to scale your footwear expertise into a brand?
Explore our comprehensive resources on shoe manufacturing and professional material sourcing. Whether you’re restoring a single pair or building a private label line, technical precision is the key to longevity.